To replace a drum head, loosen and remove every tension rod from the old head using a drum key, lift off the hoop and head, seat the new head on the bearing edge, replace the hoop, finger-tighten all rods evenly, then tune the head from scratch in a star pattern until every lug sounds the same pitch.
That's the core of it — but there's more to getting it right than just swapping one head for another. A poorly seated head won't tune evenly no matter how carefully you work the lugs. A head installed without seating will drop in pitch for days. And if you don't know which head to buy for your drum and your sound, you can spend good money on something that fights you from the start.
In this guide, we'll walk through when to replace your drum heads, which heads to choose, exactly how to remove the old head and install the new one, how to seat and tune it properly, and the most common mistakes to avoid. By the end, you'll be able to change any head on your kit with confidence — and you'll know how to get it sounding dialled-in before your next session.
When you’re done reading, you will be familiar with:
- When to Replace Your Drum Heads
- Choosing the Right Replacement Head
- What You'll Need
- Step-by-Step: How to Replace a Drum Head
- Seating and Breaking In the New Head
- Tuning the New Head
- Common Drum Head Replacement Mistakes
- Beginner Tips for Changing Drum Heads
- Final Thoughts
- FAQ

When to Replace Your Drum Heads
One of the most common mistakes beginners make is continuing to tune a dead head rather than replacing it. There's a point where no amount of careful adjustment will bring a worn-out head back to life — it's just physically past its useful lifespan. Knowing when that point has arrived saves you a lot of frustration.
Here's what to look for:
- Dents or pitting in the strike zone. The centre of the batter head absorbs the most impact over time. If you can see or feel a depression where the stick consistently hits, the head has lost its structural integrity. It won't tune evenly and will sound dead in the middle.
- Loss of tone and sustain. A fresh head rings and sustains. An old head sounds dull, thuddy, and flat — almost like hitting a cardboard box. If you've tried re-tuning and the sound still feels lifeless, the head is done.
- Wrinkling or bubbling near the collar. The collar is the curved edge where the head folds down over the hoop. If it's creasing, the head has been over-stretched or is simply old.
- Visible tears, holes, or worn-through sections. This one's obvious — replace it immediately.
- Inconsistent pitch even after careful tuning. If one lug area keeps dropping or refuses to come up to pitch relative to the others, the head is unevenly worn and no longer capable of holding even tension.
As a rough timeline: batter heads on heavily played kits typically last three to six months. Resonant heads (the bottom heads on toms and bass drum) last much longer — often a year or two — since they don't take direct hits. Snare-side heads are the most delicate and may need replacing every six to twelve months depending on your wire tension and how hard you play.
If you're unsure whether you need a full replacement or just a better tuning job, our guide on how to tune your drums is a good starting point. If the head genuinely sounds dead even after a fresh tune, it's time for a new one.
Choosing the Right Replacement Head
Drum heads vary significantly in weight, coating, construction, and sound — and the wrong choice for your playing style or drum size will disappoint even with a perfect installation. Before you buy, you need to know two things: the size of your drum and the type of sound you're after.
Getting the Right Size
Drum heads are sized to the drum's shell diameter — not the hoop diameter, and not the old head's measurement after it's been stretched. A 14-inch snare drum needs a 14-inch head. A 22-inch bass drum needs a 22-inch bass drum head. Most drum manufacturers stamp the shell size on the inside of the drum, or you can measure the inside diameter of the hoop directly. Getting this wrong is an easy mistake to make, especially when ordering online — double-check before you buy. For a full breakdown of how to measure correctly, the drum head sizing guide covers every shell type and measurement method.
Single-Ply vs. Two-Ply Heads
Single-ply heads (one layer of Mylar film) are the most responsive. They produce more overtones, more ring, and more sensitivity — great for jazz, lighter playing, and studio recording where you want the full sound of the drum. They're also less durable under hard hitting.
Two-ply heads (two layers bonded together) are thicker, more durable, and have a naturally warmer, more controlled sound with less ring. They're the standard choice for rock, metal, and any style where you're hitting hard consistently.
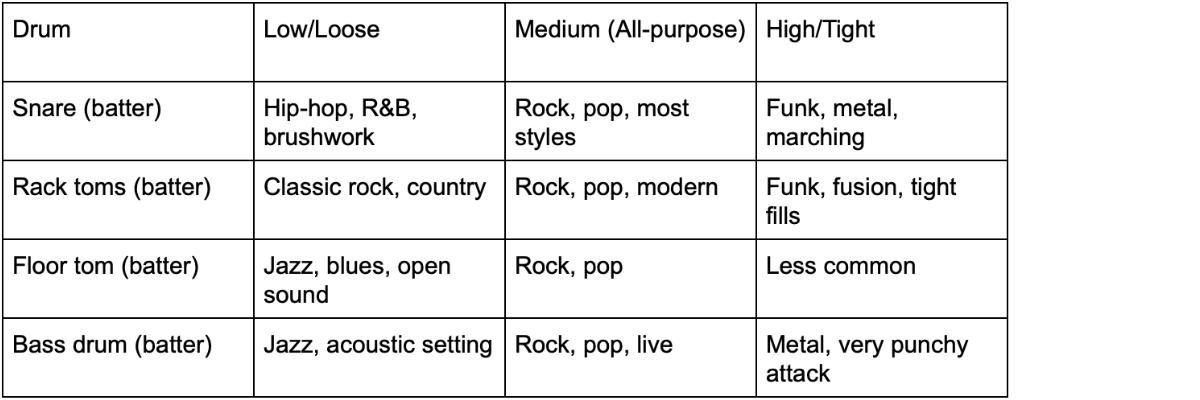
Coated vs. Clear
Coated heads have a textured white finish that naturally dampens some of the brighter overtones, producing a warmer, slightly drier tone. They're the most common choice for snare batter heads and are popular on toms in jazz and studio settings. Clear heads produce a brighter, more open tone and show off more of the drum's natural resonance — standard for rock and pop toms, and used by players who want a punchy, modern kit sound.
Resonant Heads
Resonant heads (the bottom heads on your toms and bass drum) are thinner than batter heads — they're not designed to be struck, just to vibrate sympathetically. Don't put a heavy-duty batter head on the bottom of your toms. A thin, clear single-ply head is the standard choice for tom resonant heads. For the bass drum, a ported resonant head (with a hole in it for mic placement or internal dampening) is also a valid option, especially for live work.
For a deeper look at matching heads to your sound and style, the guide to choosing drum heads covers every major type across all the main brands.
What You'll Need
Drum head replacement doesn't require many tools. Here's everything you need before you start:
- A drum key. The standard square-socket key. Most drummers carry one on the kit — if you don't have one, they cost less than a few dollars and are essential.
- The new drum head (correct size and type for the drum you're replacing).
- A clean, padded surface. A drum rug, folded towel, or drum throne with padding works well. Avoid hard surfaces that can scratch the hoop or head.
- A drum tuner (optional). A gadget like a Tune-bot can help you dial in consistent pitch across all lugs, especially when trying to match a tone from a previous head. Not required, but useful.
Step-by-Step: How to Replace a Drum Head
Work through these steps in order on any drum — snare, tom, or bass drum. The process is identical for all of them, with a few notes for bass drums at the end.
Step 1: Loosen and Remove All Tension Rods
Place the drum on a padded, stable surface with the head you're replacing facing up. Using your drum key, loosen every tension rod in a star pattern — opposite to opposite, not in a circle around the drum. This releases the tension evenly and makes the hoop easier to lift without warping.
Once the rods are loose enough to turn by hand, remove them completely and set them somewhere safe. Small tension rods have a talent for rolling off surfaces and disappearing — keep them in a cup or on a cloth.
Lift the hoop off the drum. Then lift the old head off the bearing edge and set it aside.
Step 2: Inspect the Bearing Edge and Lugs
Before installing the new head, take 30 seconds to check the bearing edge — the thin, angled lip of the shell that the head rests on. Run your finger around it and feel for chips, gouges, or uneven spots. A damaged bearing edge will prevent the head from seating evenly no matter what you do, and it'll cause tuning problems that look like head problems. If you find damage, a drum tech can repair or re-cut the bearing edge.
Also check that all the lug casings are secure and that none of the tension rod threads are stripped. A stripped lug or rod is much easier to fix before the new head goes on.
Step 3: Place the New Head on the Shell
Lay the new drum head on the bearing edge with the collar hanging down over the shell. Centre it as evenly as you can — the collar should hang down the same distance all the way around. Don't stretch or force it.
Set the hoop back over the head, lining up the holes in the hoop with the lug casings around the shell.
Step 4: Finger-Tighten All Tension Rods
Drop each tension rod through its hole in the hoop and thread it into the lug casing by hand — finger-tight only. Work in a star pattern as you go (opposite to opposite) so the hoop seats itself evenly before any real tension is applied. Don't touch the drum key yet.
Once all rods are finger-tight, check that the hoop sits level all the way around. If one side looks raised, that lug may not have caught the thread properly — back it out and re-thread carefully.
Step 5: Seat the Head
This is the step most beginners skip, and it's the reason new heads often sound inconsistent for the first few sessions. Press down firmly in the centre of the new head with the flat of your palm. You'll hear a series of crackles and pops — that's the collar of the head settling against the bearing edge and the hoop adjusting to the new tension.
Apply firm, even pressure for 10–15 seconds. Repeat two or three times. Some drummers even stand lightly on the head (with the drum on the floor) to accelerate the process — do this carefully and only on batter heads, not thin resonant heads.
After seating, go around and finger-tighten the rods again, because they'll have backed off slightly during the seating process.
Step 6: Tune the Head in a Star Pattern
Now pick up the drum key. Starting from any lug, give it a quarter turn, then move to the lug directly opposite and give that a quarter turn. Continue in a star pattern — not a circle — until you've worked through every lug once. This is one pass.
After each full pass, tap the head about an inch from each lug with a stick tip or your finger. Listen to the pitch at each point. Your goal is to get every lug sounding the same pitch. Where a lug sounds lower than the others, give it a small additional turn. Where it sounds higher, back it off slightly.
Keep making passes in quarter turns, evening up the pitch as you go, until the head produces a consistent note all the way around. Don't try to jump to your target pitch in one or two passes — gradual, even increases protect the head and give you better control over the final tone.
Step 7: Bass Drum Notes
For bass drum head changes, the process is the same but the scale is larger. You'll likely need to tip the kick drum on its side to access the head comfortably. Remove the bass drum pedal before you start — it's in the way and you don't want to accidentally damage the footboard.
Bass drum batter heads tend to be thicker and take more seating time. Apply firm pressure with both hands in the centre of the head and hold for longer. With a fresh kick head, expect the pitch to settle over the first few sessions — do a quick re-tune the day after installation.
If you're changing the front (resonant) head of the bass drum, handle it more gently — these are thinner and don't need the same pressure during seating. Just firm enough to settle the collar against the edge.
Seating and Breaking In the New Head
Even after the initial seating in Step 5, a brand new head will continue to settle over the first one to three playing sessions. The Mylar film stretches slightly as it adjusts to the tension and the collar fully conforms to the bearing edge. This means your pitch will drop a little after the first session — that's completely normal, not a sign that something went wrong.
To speed up break-in: after installing and tuning, play the drum normally for 10–15 minutes, then go back and re-check the lug pitch around the head. You'll likely find a few lugs have settled slightly lower. Even them back up and repeat the process once after the next practice session. By the third session, the head will have stabilised.
Trying to over-tighten to compensate for expected drop is a mistake — it stresses the head unevenly and can shorten its lifespan. Tune it, play it, re-tune it. Let it settle naturally.
Tuning the New Head
Once the head is evenly seated and the lugs are all producing the same pitch, you can bring it up to your target tension. The right pitch for your drum depends on the style you play, the size of the drum, and your personal taste — there's no single "correct" answer.
As a general starting point:
Resonant heads on toms are generally tuned slightly higher than the batter head — a perfect fourth or fifth above is a common starting point. This gives the tom a musical pitch descent when struck and helps the snare wires respond properly if you're tuning the snare. For a full deep-dive on dialling in your kit's pitch and getting each drum to sing together, the drum tuning guide covers all of it.
Common Drum Head Replacement Mistakes
These are the mistakes that consistently cause problems for drummers changing heads — and they're all avoidable once you know what to look for.
Skipping the Seating Step
Why it's wrong: Without seating, the collar hasn't fully conformed to the bearing edge. The head will drop pitch unevenly after the first few strokes and will feel inconsistent no matter how carefully you tuned it. You'll spend the next session re-tuning after every few songs wondering what went wrong.
How to fix it: Always seat before tuning. Press down firmly in the centre multiple times until the crackles stop. It takes 30 seconds and saves a lot of frustration.
Tuning in a Circle Instead of a Star Pattern
Why it's wrong: Going lug-by-lug around the drum stretches the head unevenly. One side ends up tighter than the other, and the head will never hold an even pitch across all the lugs.
How to fix it: Always work opposite-to-opposite. On an 8-lug drum: lug 1, lug 5, lug 2, lug 6, lug 3, lug 7, lug 4, lug 8. On a 10-lug: lug 1, lug 6, lug 2, lug 7, and so on. Muscle memory comes quickly.
Making Large Adjustments on Single Lugs
Why it's wrong: Cranking one lug several full turns to bring it up to pitch while the rest are barely tightened creates serious uneven tension across the head. This can dent the bearing edge, warp the hoop, and stress the head in one spot.
How to fix it: Small turns, spread across all lugs. If the head is very loose, do multiple star-pattern passes in quarter turns to bring it up gradually rather than forcing individual lugs to do all the work.
Not Checking the Bearing Edge Before Installing
Why it's wrong: A chipped or uneven bearing edge is one of the few problems that genuinely can't be fixed with tuning. If you install a brand-new head on a damaged edge, you'll blame the head for tuning problems that are actually the shell's fault.
How to fix it: Take 30 seconds to run a finger around the bearing edge before the new head goes on. Look for chips, flat spots, or rough patches. If you find significant damage, get it repaired first.
Buying the Wrong Head Size
Why it's wrong: A head that's too small won't seat correctly. A head that's even slightly too large won't fit under the hoop. Unlike most things, drum heads don't stretch enough to compensate for a size mismatch — you just end up with a head you can't use.
How to fix it: Measure the shell's inside diameter or check the drum manufacturer's specs before ordering. When in doubt, refer to a proper sizing guide rather than guessing.
Over-Tightening to Compensate for a Settling Head
Why it's wrong: New heads drop in pitch as they break in — that's normal. Cranking the lugs extremely tight to prevent this just stresses the head and can cause it to crack or wear unevenly at the lug holes.
How to fix it: Tune to your target pitch, play the drum, and re-tune after the first session. Accept that break-in takes a little time. It's not a problem to solve by overtightening — it's just a process to work through.
Beginner Tips for Changing Drum Heads
- Change one head at a time. It's tempting to do a full kit re-head all at once, but changing one drum at a time lets you hear how each new head affects the sound before you move on. It also means you always have a working reference point on the kit.
- Keep the old tension rods. Check each rod as you remove it. If the threads are clean and the rod spins smoothly, it's worth keeping. Tension rods are cheap but it's handy to have spares.
- Use a drum key, not improvised tools. Pliers will round the shoulder of the tension rod. A drum key has the right square socket and applies torque evenly without damaging the hardware.
- Tune in a quiet room. You need to hear the subtle pitch differences between lugs when tapping around the head. A noisy environment makes this much harder.
- Write down what works. Once you've found a tuning you like on a specific drum, jot down approximately how tight each lug is (counting quarter turns from finger-tight). Next time you change that head, you have a starting reference instead of building from scratch.
- Replace batter and resonant heads at the same time. If the batter head is worn out after six months of hard playing, the resonant head has also been taking vibration for six months. They don't wear at the same rate, but replacing both at once gives you a clean baseline to tune from.
- Let the drum settle overnight if you can. If you've installed a fresh head before a gig, tune it the night before if possible. The initial settling will happen overnight and you'll have less drop during the performance.

Final Thoughts
Replacing drum heads is one of those skills that feels daunting the first time and becomes completely routine by the third or fourth change. The actual mechanics are simple — it's the details around seating, star-pattern tuning, and choosing the right head that separate a head change that sounds great from one that never quite settles right.
Take your time with the seating step, work your lugs in star patterns with small turns, and give the head a session or two to fully break in before you decide whether you love it. Most "bad head" complaints are actually just insufficient seating or uneven lug tension — both of which are easy fixes once you know what to look for.
Fresh heads make an enormous difference. If your kit hasn't had new heads in over six months and the sound has been bothering you, a replacement is almost certainly the fix — not more dampening, not more muffling, and not a different stick.
FAQ
How often should you replace drum heads?
Batter heads on regularly played kits typically last three to six months. Resonant heads last considerably longer — often a year or two. Snare-side heads fall somewhere in between. The real indicator is sound quality and visible wear, not a fixed schedule.
Can you replace just the batter head and leave the resonant head?
Yes — in fact, that's normal. Batter heads wear out much faster than resonant heads. It's completely fine to change the batter head while leaving the resonant head in place, as long as the resonant head is still in good shape and tuning evenly.
Do I need to break in a new drum head?
Yes. The initial seating step speeds up the process, but new heads continue to settle over the first two to three sessions. Expect some pitch drop and plan to re-tune after the first use. This is normal and not a sign of a problem.
Why does my new drum head sound dead?
Most commonly: the head wasn't properly seated (the collar hasn't fully conformed to the bearing edge), the lugs aren't evenly tensioned, or the head is the wrong type for the sound you want. Go through the seating and star-pattern tuning process again before assuming the head itself is faulty.
How do I know what size drum head to buy?
Measure the inside diameter of the drum hoop, or check the shell size printed on the drum itself. The number refers to the shell's internal diameter. Do not measure the old head — it will have stretched slightly and won't give you an accurate reading.
Should batter and resonant heads be the same brand?
Not necessarily — it's more about matching the head type to the sound you want. Many drummers mix brands. That said, sticking with the same brand's recommended batter/resonant pairing is a good starting point when you're still learning what you prefer.
What's the difference between coated and clear drum heads?
Coated heads have a textured white film that softens the attack and reduces high-frequency ring — warmer, drier sound. Clear heads are brighter, with more resonance and overtones. Coated heads are standard on snares; both are used on toms depending on the sound and style.
Can I use a drum head after it has a small crack near the edge?
No — replace it immediately. A crack will spread quickly under playing tension and can damage the hoop or bearing edge if it fails mid-session. A cracked head is a finished head.


