To tune a snare drum, seat both heads evenly, finger-tighten every lug, then tune each lug in a star pattern with small, equal turns until the pitch around the drum is consistent — top head for tone, bottom head for response, and snare wires set just tight enough to crack cleanly without choking.
That's the short version. The longer version is where most drummers get stuck, because the snare is the only drum on your kit with two heads doing two different jobs and a set of wires that have to work in sync with both. Tune it well and your snare cuts through any mix with that sharp, punchy crack you actually want. Tune it badly and it sounds boxy, choked, or buzzes every time you hit a tom.
In this guide, we'll walk through how the snare drum actually works, what tools you need, a clear step-by-step on tuning the top (batter) head, the bottom (resonant) head, and the snare wires, the most common tuning mistakes beginners make, and how to dial in different snare sounds for different musical styles. By the end you'll be able to tune your snare from scratch and adjust it on the fly when something sounds off.

When you’re done reading, you will be familiar with:
- Why Snare Tuning Matters
- How a Snare Drum Works
- What You'll Need to Tune Your Snare
- Step-by-Step: How to Tune Your Snare Drum
- Setting the Snare Wires
- Common Snare Tuning Mistakes
- Tuning for Different Sounds and Styles
- Beginner Tips for Better Snare Tuning
- Final Thoughts
- FAQ
Why Snare Tuning Matters
The snare is the loudest, most exposed voice in your kit. It carries the backbeat, defines the groove, and is the drum your listeners hear most clearly. A snare that's out of tune will fight you on every stroke — choking your ghost notes, killing your rim shots, and buzzing every time the bass player hits a low note.
Three reasons to take snare tuning seriously:
- Tone and projection. A well-tuned snare cuts through guitars, bass, and vocals without needing to be hit harder. You get more volume from technique instead of brute force.
- Snare wire response. The crack of a snare comes from the wires reacting to the bottom head. If the bottom head is too loose or unevenly tensioned, the wires won't respond consistently — some strokes crack, others thud.
- Sympathetic buzz control. A snare that's tuned poorly relative to your toms will buzz almost constantly. Good tuning isn't just about the snare in isolation — it's about how it sits inside the whole kit.
If you're brand new to tuning in general, our guide on how to tune your drums covers the broader fundamentals you'll want alongside this snare-specific deep dive.
How a Snare Drum Works
Before you start cranking lugs, it helps to understand what you're actually tuning.
A snare drum has two heads. The batter head sits on top — it's the one you hit, and it controls most of the drum's tone, attack, and feel. The resonant head (also called the snare-side head) sits on the bottom. It's much thinner, and its job is to vibrate sympathetically with the batter head, which in turn rattles the snare wires stretched across it. Those wires are what give a snare drum its characteristic buzz and crack — without them, you'd just have a small, high-pitched tom.
The two heads work together. The pitch of the batter head sets the fundamental tone, and the pitch of the resonant head determines how quickly and cleanly the snare wires respond. Get one wrong and the other can't do its job. If you want a fuller breakdown of every component, our complete overview of drum set parts walks through each piece of the kit and how they interact.
This is why a snare drum has more variables than any other drum on your kit, and why it rewards careful tuning more than any other drum, too.
What You'll Need to Tune Your Snare
You don't need much. The whole job takes about 10–15 minutes once you know what you're doing.
- A drum key. The standard square-socket key fits every standard tension rod. Don't try to use pliers — you'll round the rods.
- A flat, padded surface. A drum throne with a towel on it works. So does carpet. Avoid hard surfaces that mute the head while you're tuning.
- Your ears. Most of the work is done by ear. A drum tuner (like a Tune-bot) can help if you want repeatable numbers, but it's not required.
- A new head, if needed. If your batter head is dented, stretched, or showing pitting around the strike zone, no amount of tuning will save it. Replace it before tuning. Our guide on how to choose drum heads covers what to pick for the sound you want.
Step-by-Step: How to Tune Your Snare Drum
Here's the full process. Work through it in order — skipping steps is how snares end up sounding flubby.
1. Loosen Both Heads Completely (Optional, but Recommended)
If you're putting on a new head, or if your snare hasn't been tuned in months and sounds chaotic, start fresh. Turn off the snare wires using the strainer, then back every tension rod off until you can wiggle the head with your fingers.
This gives you a clean baseline. Tuning into existing tension just preserves whatever was wrong before.
2. Seat the Batter Head
Put the head on, place the hoop over it, and finger-tighten every tension rod until each one just touches the hoop. Then press down firmly in the center of the head with the palm of your hand. You'll hear small crackling sounds — that's the head seating itself against the bearing edge of the shell. Some drummers even stand on a fresh head briefly to seat it (carefully, with the drum on the floor).
Finger-tighten the rods again after seating, because they'll loosen slightly. Make sure you have the right replacement size — our quick reference on how to measure drum heads covers exactly how.
3. Tune the Batter Head in a Star Pattern
This is the most important step. Never tune in a circle — always opposite to opposite, in a star pattern. On a standard 10-lug snare it looks like this: lug 1, then directly across to lug 6, then lug 2, then lug 7, then lug 3, lug 8, and so on. This keeps the tension even across the head, which is what gives you a clean, pure pitch.
Turn each lug a quarter turn at a time. Don't crank one lug a full turn and then try to even it up later — you'll fight that imbalance for the rest of the tune-up.
After your first full pass, tap the head about an inch in from each lug (use a stick tip or your finger). You'll hear each lug's pitch. Your job is to get all ten lugs producing the same pitch. If one lug is lower, give it a small turn. If it's higher, back it off.
Repeat until every lug sounds the same. The overall pitch of the batter head doesn't matter yet — what matters is that it's even all the way around.
4. Set Your Target Pitch for the Batter Head
Once it's even, you can dial in your preferred pitch. Tighten all lugs equally (quarter turn at a time, star pattern) until you reach the sound you want:
- Low and fat: Loose batter, good for rock, hip-hop, jazz brushwork.
- Medium and balanced: Most common all-purpose tuning. Works for almost any genre.
- High and crisp: Tight batter, classic funk, fusion, marching, and pop.
A useful rule of thumb: the batter head should feel firm when you press down on it but should still give slightly. If it feels rock-hard, you've gone too far.
5. Flip the Drum and Tune the Resonant Head
The bottom head is thinner and more delicate. Loosen the snare wires off completely first so they don't get in your way (and so you don't accidentally damage them).
Repeat the same process: finger-tighten, seat, then star-pattern tune in quarter turns. The resonant head is generally tuned higher than the batter head — usually a perfect fourth or fifth above, but you don't need to be precise about the interval.
A tighter resonant head gives a faster, snappier wire response. A looser resonant head gives a fatter, more open sound with a slower wire reaction. Aim for tight and even as your starting point; you can experiment from there.
6. Reattach the Snare Wires
Once both heads sound good independently, flip the drum back over and reset the snare wires. Stretch them across the resonant head, attach both ends of the strap or cord, and use the strainer to set tension.

Setting the Snare Wires
The snare wires are the difference between a snare drum and a small tom. Setting them right is the final piece of the puzzle.
With the strainer engaged (wires on), tighten the snare strainer just until the wires lift off the resonant head and tighten against it. You want the wires lying flat across the head, with even tension from end to end.
Test by hitting the batter head with a normal stroke. You're listening for:
- A clean crack with a quick "snap". That means your wires are at good tension.
- A muffled, choked thud. Wires are too tight. Back them off slightly.
- A long, sloppy buzz that won't stop. Wires are too loose, or one side of the strap is uneven. Tighten or re-seat the wires evenly.
A common test: play a soft stroke near the rim and listen for sensitivity. If a light ghost note doesn't activate the wires, they're either too loose or unevenly seated. If a full stroke chokes, they're too tight.
The strainer should give you fine-tune control once the initial tension is set. Most snares have a knob on the side that lets you make small adjustments without taking the wires off — use it.
Common Snare Tuning Mistakes
These are the snare tuning mistakes I see all the time, and the fixes that actually work.
Tuning in a Circle Instead of a Star Pattern
Why it's wrong: Going lug-by-lug around the drum stretches the head unevenly. One side ends up tighter than the other, and you'll never get a clean, pure tone.
How to fix it: Always tune opposite-to-opposite. Star pattern, every time, no exceptions. It takes 30 seconds longer and saves you 30 minutes of frustration.
Cranking One Lug Way Tighter Than the Others
Why it's wrong: Big single-lug adjustments warp the head and dent the bearing edge over time. Even if the drum sounds okay short-term, you're shortening the life of both the head and the shell.
How to fix it: Small turns, distributed across all lugs. If you need to raise the pitch significantly, do another full star-pattern pass with quarter turns rather than two big turns on two opposite lugs.
Ignoring the Resonant Head
Why it's wrong: Most beginners obsess over the batter head and barely touch the resonant. A poorly tuned resonant head kills your snare wire response and is responsible for about 90% of "my snare sounds bad" complaints.
How to fix it: Tune the resonant head with the same care as the batter. Aim for higher pitch and even tension. If the snare sounds dead or unresponsive, the bottom head is almost always the culprit.
Over-Tightening the Snare Wires
Why it's wrong: Cranking the wires down hard makes the drum sound choked and lifeless. It also kills your dynamic range — ghost notes won't speak, and rim shots lose their crack.
How to fix it: Tighten only until the wires snap cleanly. Less is more here. If you're not sure, back them off until you hear too much buzz, then tighten just enough to clean it up.
Sympathetic Buzz When Toms Are Hit
Why it's wrong: This isn't really a tuning mistake — it's a fact of life with snare drums. But excessive buzz means your snare is tuned in sympathy with a nearby tom or cymbal frequency.
How to fix it: Try raising or lowering your snare batter head pitch by a small amount until the buzz reduces. You can also slightly retune the offending tom. Some buzz is normal and inevitable; you're aiming to minimize it, not eliminate it entirely.
Tuning for Different Sounds and Styles
Once you can tune to a clean baseline, you can dial in different sounds for different musical contexts. Here's a starting reference:
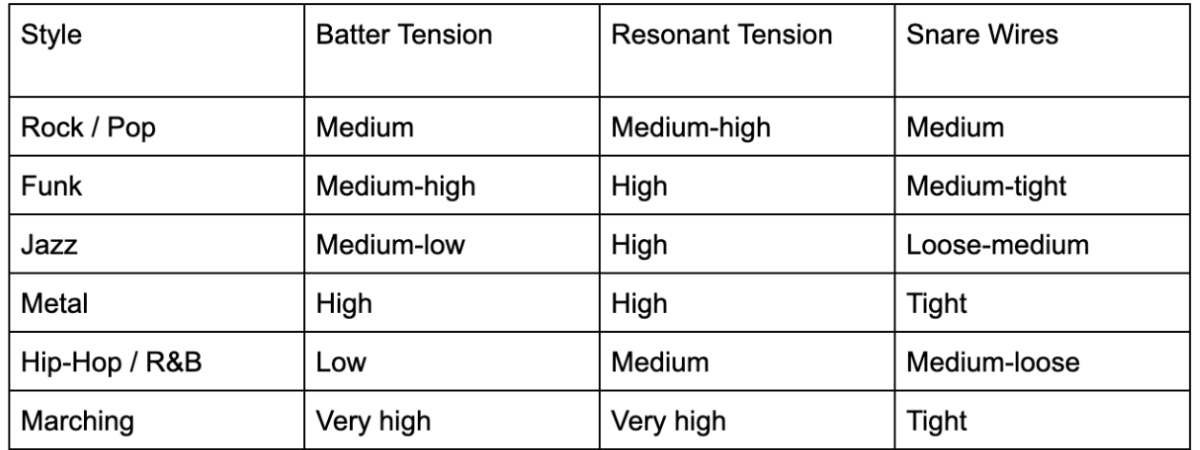
These are starting points, not rules. Every snare drum has a personality — a wood shell snare and a steel shell snare at the same tension will sound completely different. Tune to what the song needs and what your shell wants to do.
I usually do a quick tune-check before any session: a few strokes around the head, listen for evenness, a tap in the middle to check overall pitch, then a roll to check the wire response. Takes about 90 seconds and saves you from playing a session with a snare you'll hate hearing back on the recording.
Beginner Tips for Better Snare Tuning
A few habits that pay off fast:
- Tune in a quiet room.You need to hear small pitch differences between lugs. A noisy room makes that almost impossible.
- Tap close to each lug — not the center. Tapping near a lug gives you that specific lug's pitch. Tapping the center gives you the overall fundamental, which is useful for the final check but not for evening up the lugs.
- Use the same drum key, always. Different keys can have slightly different tolerances. Pick one and stick with it for consistency.
- Replace heads regularly. Even with perfect tuning, an old, stretched head won't sound good. A batter head used heavily lasts roughly 3–6 months before tone starts to fall off.
- Don't over-dampen. If you can't make the snare sound the way you want by tuning, the answer isn't piling on moongel and tape. It's better tuning. Dampening should be a small final touch, not a band-aid.
- Write down what works. Once you find a snare tuning you love, jot down which lugs you adjusted and roughly how much. Next head change, you'll save yourself half the trial-and-error.
Final Thoughts
Snare tuning isn't a one-time job — it's a maintenance habit. Heads stretch, lugs settle, humidity changes, and a snare that sounded perfect last week can drift in a way you'll notice the moment you sit down to play.
The good news: once you've done it carefully two or three times, your ears get fast at it. You stop thinking lug-by-lug and start hearing the whole drum. Cracking open a fresh head and tuning a snare from scratch becomes a 10-minute job rather than an hour-long puzzle.
Star pattern, quarter turns, both heads, then the wires. That's the whole framework. The rest is just practice and getting to know what your specific snare drum wants to sound like.
FAQ
How often should I tune my snare drum?
At minimum, check it every time you sit down to play. A quick lug-tap test takes 30 seconds. A full re-tune happens whenever you change heads, after long gigging stretches, or when the snare just doesn't sound right anymore.
Should the batter head or resonant head be tighter?
The resonant head is almost always tighter than the batter head — typically a perfect fourth or fifth higher in pitch. This is what gives the snare its sensitivity and crack.
What pitch should my snare drum be tuned to?
There's no single correct pitch. Most 14-inch snare drums sound good with the batter head somewhere in the A to C range (above middle C). Use your ear and the style you're playing as the guide, not a tuner.
Why does my snare buzz when I hit my toms?
Sympathetic buzz happens when your snare's resonant frequency matches one of your toms. Small adjustments to either the snare's batter pitch or the tom's pitch usually solve it. Some buzz is normal — completely eliminating it is impossible.
Do I need a drum tuner like a Tune-bot to tune my snare?
No. Most pros tune by ear. A tuner can be helpful for matching lugs precisely or recreating a specific tuning from session to session, but it's not required, especially for beginners.
How tight should the snare wires be?
Tight enough that they snap cleanly on a normal stroke, loose enough that ghost notes still speak. If the drum sounds choked, you've gone too far. If it buzzes endlessly, you haven't gone far enough.
Can I tune a new snare head right out of the box?
Yes, but seat it first. Press down firmly in the center to break in the head, then finger-tighten and start your star-pattern tuning. A freshly seated head will drop slightly in pitch for the first few practice sessions — that's normal.


