The best drum set for kids is one that fits their age, physical size, and interest level — typically a 3-piece or 4-piece junior kit for younger children (ages 3–7) and a scaled-down standard 5-piece for older beginners (ages 8 and up). The key is matching the drum sizes to your child's reach and height so they can sit comfortably and actually develop good technique from the start.
That said, "just get the smallest one" isn't really a strategy. There are junior kits designed for toddlers who mostly want to bang things, and there are proper beginner kits sized for growing players who want to actually learn. Getting that distinction wrong either frustrates a motivated kid with a toy-grade setup or overwhelms a five-year-old with a full-size kit they can't physically play. This guide helps you avoid both.
We'll cover what to look for at each age range, whether acoustic or electronic makes more sense for your situation, which features are worth paying for and which aren't, common buying mistakes parents make, and how to set up the kit so your child can play it correctly from day one. By the end, you'll know exactly what to look for — and what to skip.
When you’re done reading, you will be familiar with:
- What to Look for in a Kids Drum Set
- Choosing by Age and Size
- Acoustic vs Electronic for Kids
- Features Worth Paying For
- Setting Up a Kids Drum Kit Correctly
- Common Buying Mistakes
- Beginner Tips for Parents and Young Drummers
- Final Thoughts
- FAQ
What to Look for in a Kids Drum Set
Not every drum kit labelled "kids" is worth buying, and not every adult beginner kit is too big for a child. Before getting into specific recommendations, here are the factors that actually matter when evaluating a kids' kit:
Shell Sizes
This is the most important factor. A child who can't comfortably reach the hi-hats or whose feet barely touch the pedals will struggle to play correctly — and more importantly, will get frustrated and quit. Junior kits typically feature a 16" or 18" bass drum (vs. the standard 22"), smaller rack toms (8" and 10" instead of 10" and 12"), and a shorter snare drum. These proportions matter for reach, posture, and developing proper technique.
A rough guide:
- Ages 3–5 (height under 3'6"): Junior kits with a 16" bass drum
- Ages 6–9 (height 3'6"–4'6"): Junior kits with an 18" bass drum, or compact 5-piece kits
- Ages 10+ (height 4'6"+): Standard beginner 5-piece kits — same as adult beginners
Build Quality
Very cheap drum kits — typically under $80 — are usually made from low-grade materials that go out of tune after one session, have hardware that strips easily, and produce a sound that would make anyone want to quit. You don't need to spend a fortune, but kits from established drum brands (Pearl, Ludwig, Tama, Alesis, Roland) at the $150–$400 range for kids are genuinely playable instruments, not toys.
Hardware and Pedals
On beginner kids' kits, the bass drum pedal is one of the first things to fail. Look for a pedal with a metal base rather than plastic — plastic base pedals flex and crack within weeks. The same goes for cymbal stands and the drum throne: metal hardware that stays tight under repeated use is worth the extra few dollars.
Drum Throne Height
The throne (drummer's seat) on a kids' kit must adjust low enough for the child to sit with their thighs roughly parallel to the floor. Many kits aimed at kids use thrones that don't go low enough. Check the minimum height adjustment before buying — for a five-year-old, you need a throne that can sit around 14–16 inches from the floor.
Choosing by Age and Size
Age is a rough guide — physical size and interest level matter just as much. A tall, motivated 7-year-old may be ready for a compact 5-piece. A small, young 10-year-old might still need a junior kit. Use the height guidance above alongside age, and trust what you can see when you sit your child behind a kit in a store.
Ages 3–5: Junior Starter Kits
At this age, the goal isn't technique — it's musical exploration and basic coordination. A simple 3-piece kit (bass drum, snare, hi-hat) or a 5-piece junior kit with a 16" bass drum is appropriate. Don't worry about quality too much at this stage; a child this young may lose interest within a year and move on to something else. Focus on finding something durable, adjustable, and not so cheap that the hardware collapses on the first use.
Good options in this age range typically come from brands like Pearl (the Roadshow Jr.), Ludwig (Questlove Pocket Kit), and Gammon Percussion. Electronic options like the Alesis Debut Kit are also excellent here, since they give parents some volume control via a headphone jack.
Ages 6–9: Junior Kits with Better Hardware
This is the sweet spot for dedicated beginner kids' kits. A child in this age range can start learning proper technique — how to hold drumsticks, basic rock beats, simple coordination exercises — and needs a kit that won't fight them while doing it. A 4-piece or 5-piece junior kit with an 18" bass drum, decent hardware, and a playable snare is the target.
At this stage, head quality starts to matter. Many kits in this range ship with low-quality heads that muffle the drum and make everything sound dull. Swapping the batter heads for a set of Evans or Remo beginner heads after purchase makes a noticeable difference and doesn't cost much.
Ages 10 and Up: Compact Beginner Kits
A child aged 10 or over can typically handle a full-size beginner kit — the same 5-piece setups recommended for adult beginners. Brands like Pearl, Ludwig, Yamaha, and Tama all offer solid entry-level 5-piece kits in the $300–$600 range that will last through the beginner and intermediate stages without needing to be replaced. Buying a proper kit now avoids the cost of upgrading from a junior kit in 12–18 months.
If your child is serious about drumming and has been playing on a junior kit for a while, making the jump to a real kit is almost always the right move. Proper drum set parts at proper sizes unlock technique that junior kits simply can't teach.
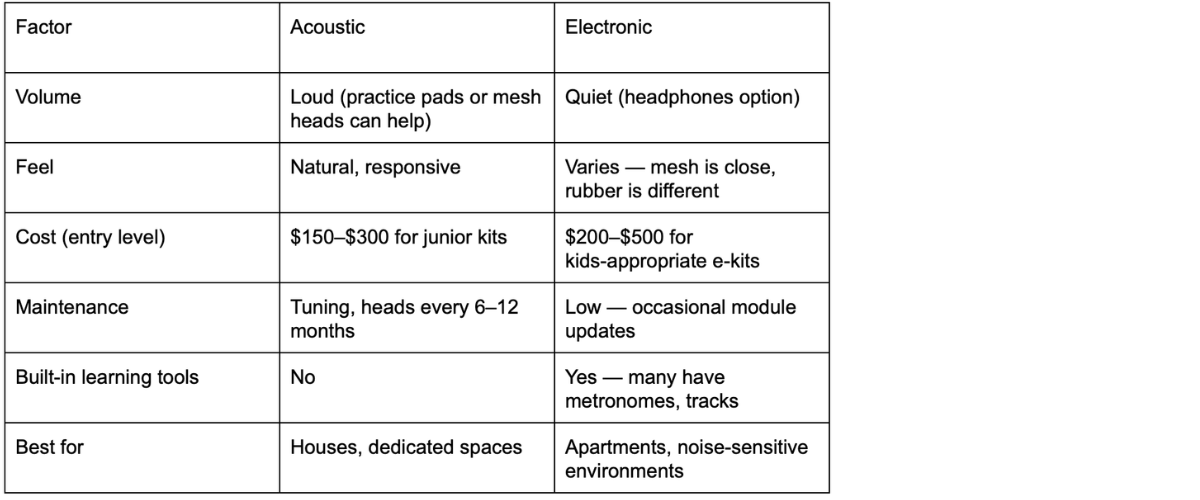
Acoustic vs Electronic for Kids
This is the question most parents ask first, and it usually comes down to one factor: noise. Let's be honest — acoustic drums are loud. A child practicing in a bedroom or apartment on an acoustic kit is a significant disruption, and soundproofing a room costs more than the drums themselves.
Acoustic Drum Sets
Pros: Better physical feedback, more natural feel for developing technique, usually cheaper at entry level, and — for motivated beginners — simply more fun to play. There's a tactile energy to hitting a real drum that electronic pads can't fully replicate, and that energy keeps kids engaged.
Cons: Very loud. Not suitable for apartments, houses with thin walls, or situations where noise is a serious issue. Also require more maintenance (tuning, head replacement) over time.
Best for: Houses with some space to absorb sound, garages, basements, or situations where parents are willing to invest in basic soundproofing (a drum rug and mesh heads help considerably).
Electronic Drum Kits for Kids
Pros: Dramatically quieter — rubber or mesh pad kits played through headphones are suitable for apartments and most shared living situations. Many electronic kits include built-in training features, metronomes, and backing tracks that help beginners develop timing. Alesis and Roland both make child-appropriate electronic kits that are genuinely good starter instruments.
Cons: More expensive at the same quality level. The playing feel — especially on rubber pad kits — is different from acoustic drums, which can make the transition to a real kit feel awkward later. Mesh head electronic kits play more naturally but cost more.
Best for: Apartments, shared walls, situations where volume is a hard constraint, or families where the child wants to practice late at night. The Alesis Debut Kit and Roland TD-02K are good starting points for kids in the 6–12 age range.
Features Worth Paying For
When evaluating kids' kits in a similar price range, these are the features that separate a good kit from a frustrating one:
- Double-braced hardware. The stands and throne on a kids' kit take abuse. Double-braced stands stay put; single-braced stands wobble and tip.
- A real hi-hat pedal. Some very cheap kits include a single "hat" cymbal with no pedal. A proper hi-hat stand and two cymbals is important for learning real technique from the start.
- Adjustable bass drum pedal spring tension. A child's foot has less strength than an adult's. A pedal where you can reduce spring tension makes the bass drum easier to control and builds leg strength gradually.
- Durable throne with locking height adjustment. A throne that drops mid-practice is a safety issue and a frustration. The height-lock mechanism should feel solid.
- Replaceable heads. Standard lug-style drum heads mean you can swap them out as the child progresses. Some very cheap kits use non-standard sizes that are hard to replace.
Setting Up a Kids Drum Kit Correctly
Even the best kids' kit will feel wrong if it isn't set up to fit the child. This is something parents often overlook, and it matters more than any piece of gear.
Throne Height
Sit your child on the throne and adjust until their thighs are roughly parallel to the floor (or angled very slightly downward). Knees should be at approximately 90 degrees. If the throne is too high, the child won't be able to control the bass drum pedal properly. Too low, and their arms are cramped reaching the snare.
Snare Position
The snare should sit directly in front of the child, close to their body, with the playing surface roughly at elbow height when their arms are at their sides. If they have to reach for it or hunch over it, move it closer and lower it.
Bass Drum Pedal
Make sure the child's heel can rest comfortably on the footboard with their foot flat. The beater should be angled so it makes clean contact with the head when the pedal is pressed. If their foot doesn't reach the pedal properly, the throne needs to come down.
Hi-Hat Height
The hi-hat should be positioned so the child can comfortably reach it with their non-dominant hand without stretching. A good starting height is about the same level as the snare, slightly to the left. Lower it until the reach feels natural — hunching toward the hi-hat creates bad habits.
Cymbal and Tom Angles
Toms should tilt slightly toward the player (about 10–15 degrees) so stick rebound is clean. Cymbals should tilt away slightly — not flat, which causes them to crack over time, and not so angled that they're hard to hit cleanly. If you're new to this, our guide to setting up a drum set covers the full ergonomic layout step by step.
Common Buying Mistakes
These are the most frequent mistakes parents make when buying a first drum kit for a child — and how to avoid them.
Buying an Undersized Toy Kit "Just to See If They're Interested"
Why it's wrong: Toy drum kits — typically drum pads mounted on a plastic frame, sold for $30–$60 — don't teach any real technique and often sound terrible. A child who's genuinely interested in drums will be frustrated by a toy kit, not encouraged. It's not a lower-stakes test; it's just a worse experience.
How to fix it: If the child is serious enough to ask for drums, invest in at least an entry-level junior kit from a real drum brand. The price difference between a toy kit and a playable junior kit is often $100–$150. That difference is worth it.
Buying a Full Adult Kit for a Young Child
Why it's wrong: A standard 22" bass drum, full-height stands, and adult-proportion hardware is physically difficult for a young child to play correctly. They'll develop compensatory habits — hunching, over-reaching, tensing up — that are hard to undo later.
How to fix it: Match the kit size to the child's current height, not the height you expect them to reach. A junior kit now and an upgrade in a few years is a better investment than a full-size kit the child can't yet play comfortably.
Ignoring the Drum Throne
Why it's wrong: Many budget kits include a throne that doesn't adjust low enough for a small child. The child ends up perched awkwardly with feet dangling, which prevents them from using the bass drum pedal or hi-hat pedal at all.
How to fix it: Check the minimum throne height before buying. If it doesn't go low enough, budget for an aftermarket drum throne that does. This is often a $30–$50 fix.
Skipping the Drum Rug
Why it's wrong: On hard floors, an acoustic kit will slide around as it's played — especially the bass drum. This is frustrating to deal with mid-practice and can damage the floor. Kids tend to play harder and less controlled than adults, which makes this worse.
How to fix it: A basic drum rug (or even a large, non-slip area rug) keeps everything in place and also reduces sound transmission through the floor slightly. It's a cheap fix that makes a real difference.
Not Checking Head Quality
Why it's wrong: Many budget junior kits ship with low-quality, heavily muffled heads that produce a dull "thud" no matter how well the kit is tuned. A child learning to match what they hear on recordings will be confused by a kit that sounds nothing like real drums.
How to fix it: After purchase, consider replacing the stock batter heads with basic Evans or Remo heads in the correct sizes. This is often a $30–$60 upgrade that transforms how the kit sounds and feels. Knowing how to choose drum heads will help you pick the right type for a beginner.
Beginner Tips for Parents and Young Drummers
- Start with the basics before gear. Before buying anything, have your child watch a few beginner drumming videos online. If the interest holds after a week of watching, it's genuine — not just novelty.
- Invest in earplugs or hearing protection. Acoustic drums are genuinely loud. Children's hearing is more sensitive than adults'. Foam earplugs or kids' hearing protection earmuffs should be non-negotiable for practice sessions. Budget $10–$20 for this alongside the kit.
- Get them started with a practice pad first. A drum practice pad teaches grip, stick control, and basic rudiments without any of the tuning or setup challenges of a full kit. Spending a few weeks on a pad before introducing the kit builds coordination that transfers directly to the drums.
- Teach grip before beats. The most important thing in the first few weeks isn't what they play — it's how they hold the sticks. Good grip from the start prevents tension and injury, and makes everything easier. Our guide on how to hold the drumsticks covers both matched and traditional grip in simple terms.
- Use a metronome from week one. A child who learns to play without a click develops rhythm habits that are hard to fix later. Even the most basic digital metronome (or a free metronome app) is enough to start with.
- Don't over-schedule practice. 15–20 minutes daily is more effective for young beginners than hour-long weekend sessions. Consistency matters more than duration, and short sessions prevent frustration and physical fatigue.
- Let them choose what to play. Kids stay interested when they're working on music they actually like. If your child wants to learn a pop song they know, that's a better first goal than a formal beginner exercise — the exercises can come later, once the excitement is established.

Final Thoughts
Getting your child started on drums is one of the best musical investments you can make — rhythm is foundational to almost every other instrument, and the physical coordination, timing, and focus that drumming builds transfers far beyond music. The kit itself is just the starting point.
Match the size to the child, prioritize playability over price, and set it up properly so they can actually develop real technique. A motivated young drummer who starts on the right kit and learns correct fundamentals early — good grip, proper posture, basic rudiments on a practice pad — will progress faster than one who spends years fighting a badly sized or badly set up instrument.
The good news: at the junior kit level, you don't need to spend a lot to get something genuinely useful. $200–$300 from a reputable brand sets most kids up well for their first few years of drumming.
FAQ
What age is appropriate for a first drum set?
Most children show the coordination needed for a simple drum kit around age 3–4 for toy-level play, and age 5–6 for a real junior kit. There's no hard rule — it depends on the child's coordination, attention span, and genuine interest. A child who's naturally drawn to rhythm (banging pots, tapping constantly) is usually ready earlier than their age suggests.
Are cheap kids' drum sets worth buying?
Very cheap kits (under $80) are generally not worth it — the hardware is flimsy, the heads are unplayable, and the kit won't survive more than a few months of real use. Junior kits from established brands in the $150–$300 range are a much better investment and will actually teach the child something.
Should I buy acoustic or electronic drums for a child in an apartment?
Electronic drums are the practical choice for apartments and shared walls. Look for a mesh pad e-kit rather than rubber pads — the playing feel is significantly closer to acoustic drums, and mesh pads are quieter. The Alesis Debut Kit and Roland TD-02K are both well-regarded options for this situation.
How long will a junior kit last before my child outgrows it?
Most kids outgrow a junior kit physically within 2–4 years, depending on how fast they grow. A child who starts at age 5–6 on a junior kit will typically be ready for a full-size kit by age 8–10. Musically, if they're progressing quickly, the limitation may come earlier.
Do I need to buy cymbals separately for a kids' kit?
Most kids' drum sets are sold as complete setups including hi-hats, one or two crashes, and a ride (or a single crash cymbal). Starter packs bundle everything you need to start playing. As the child advances, adding a second crash cymbal or upgrading the hi-hats can improve the sound, but it's not necessary at the beginner stage.
How do I keep the bass drum from sliding around on the floor?
A drum rug is the simplest fix. Non-slip rug pads under a regular area rug also work. Some bass drums come with spurs (metal spikes at the bottom) that can dig into carpet — make sure those are deployed if the kit is on carpet. On hard floors, a rug is the only reliable solution.


