To mix drums, you gain-stage each track first, clean up bleed and timing with editing or gating, shape each drum's tone with EQ, control dynamics with compression, then blend everything together with panning, reverb, and bus processing until the whole kit sounds like one instrument instead of a pile of separate mics.
That's the short version, and it's also where most home recordists get stuck — not because any single step is hard, but because drums involve more microphones, more overlapping frequencies, and more bleed than almost anything else you'll record. A guitar is one signal. A drum kit might be eight, ten, or even sixteen tracks all fighting for the same space.
In this guide, we'll walk through how to mic a kit properly (since a mix starts at the source), the core tools you'll use — gain, EQ, compression, and gating — a full step-by-step mixing workflow, a drum EQ cheat sheet you can reference every time you sit down at the DAW, genre-specific tips for getting a tight, aggressive kick and snare for rock and metal, and the mistakes that make most beginner drum mixes sound thin or muddy. By the end, you'll have a repeatable process instead of just twisting knobs until something sounds okay.
When you’re done reading, you will be familiar with:
- Why Drum Mixing Matters
- How to Mic a Drum Kit (Where the Mix Really Starts)
- The Mixing Toolkit: Gain, Editing, EQ, Compression, and Gates
- Step-by-Step: How to Mix a Drum Kit
- Drum EQ Cheat Sheet
- Getting a Tight, Aggressive Kick and Snare for Rock and Metal
- Common Drum Mixing Mistakes
- Beginner Tips for Better Drum Mixes
- Final Thoughts
- FAQ

Why Drum Mixing Matters
Drums are the backbone of a rock or metal mix. If the kick and snare aren't sitting right, nothing else in the song locks in — the guitars feel disconnected from the groove, the vocal fights for space, and the whole track feels smaller than it should. A well-mixed kit gives every other instrument something solid to sit on top of.
It's also the part of production most drummers skip past, because playing the kit is the fun part and staring at EQ curves is not. But if you're recording your own playing — whether for a demo, a cover, or a full release — knowing how to mix drums is what turns a decent take into something that actually sounds like a record.
How to Mic a Drum Kit (Where the Mix Really Starts)
You can't EQ your way out of a bad mic placement. Where you put the mics determines what tone you're working with before a single plugin gets loaded, so it's worth getting this right first.
Kick Drum
Most drummers use two mics on the kick: one inside the shell (through a port hole in the resonant head) aimed at the beater for attack and click, and one outside the front head for low-end body. If you're only using one mic, place it just inside the port hole, a few inches back from the beater — closer gets you more click and attack, farther back gets you more boom.
Snare Drum
A single mic angled toward the batter head, about an inch or two above the rim and pointed slightly across the drum rather than straight down, captures the crack without picking up too much hi-hat bleed. Many engineers add a second mic underneath, aimed at the snare wires, to bring out the buzz and attack — especially useful for metal, where snare crack needs to cut through distorted guitars. A properly tensioned snare drum tuning makes this whole job easier, since a drum that already sounds right needs far less correcting later.
Toms
One mic per tom, a couple of inches above the rim and angled toward the center of the head, works for most setups. Clip-on mics are common because they stay out of the way of a drummer's stick pattern during fills.
Overheads
A stereo pair of overhead mics, positioned evenly above the kit, captures the cymbals and gives you a sense of the whole kit as one instrument. Overheads matter more than most beginners realize — in a lot of rock and metal mixes, the overheads (not the close mics) are what glue the kit together and make it sound like a real room rather than a stack of samples.
Room Mic
An optional mic placed further back in the room adds size and ambience. It's not required, especially in a small home setup, but even a small amount blended in can make a dry, close-mic'd kit feel much bigger.
The Mixing Toolkit: Gain, Editing, EQ, Compression, and Gates
Before jumping into the workflow, it helps to know what each tool is actually doing. These aren't unique to drums, but drums use all of them more heavily than most other instruments.
- Gain staging: Setting the input and playback levels of each track so nothing clips and everything has room to breathe before you touch a single plugin.
- Editing: Lining up hits, trimming stray noise between hits, and fixing timing issues track by track.
- Gating: A plugin that mutes a track when it's below a certain volume threshold, used to cut down on bleed from other drums leaking into a mic that isn't supposed to be picking them up.
- EQ (equalization): Boosting or cutting specific frequency ranges to shape a drum's tone — more low end, less boxiness, more attack, and so on.
- Compression: Reducing the difference between the loudest and quietest parts of a signal, which makes a drum feel more consistent and controlled, especially useful for snare and room mics.
Step-by-Step: How to Mix a Drum Kit
Here's the order I actually work in. Skipping ahead to EQ before your gain and editing are sorted just means you're EQing problems that shouldn't be there in the first place.
1. Gain Stage Every Track
Pull every fader down to unity and check that no track is clipping on the loudest hits. Aim for a healthy, consistent level across kick, snare, toms, and overheads before you add any processing. This step is boring, but it's the difference between a mix that comes together easily and one that fights you the whole way.
2. Edit for Timing and Bleed
Trim obvious noise between hits, and if timing is loose in a few spots, nudge hits into the grid. Don't over-quantize — a small amount of natural timing variation is what makes a drum performance feel human instead of programmed.
3. Gate the Close Mics (If Needed)
If your tom mics are picking up a lot of snare and kick bleed, a gate can clean that up so the toms only sound when they're actually being played. Set the threshold carefully — too aggressive and you'll cut off the natural decay of the drum, which sounds unnatural fast.
4. EQ Each Element
Start subtractive — cut the frequencies that sound boxy, harsh, or muddy — before you reach for boosts. Once each drum sounds clean on its own, add small boosts to bring out what makes it sound good (the thump of the kick, the crack of the snare). We cover specific frequency ranges in the cheat sheet below.
5. Compress for Consistency
Light compression on the snare and kick evens out the difference between hard hits and ghost notes. Room and overhead compression, used more aggressively, is a classic rock and metal trick for making a kit feel bigger and more aggressive — it's often called "parallel compression" when blended in alongside the uncompressed signal rather than replacing it.
6. Pan for Width
Overheads typically go hard left and right (or close to it) to establish the stereo width of the kit. Toms are usually panned to roughly match their physical position behind the kit — high tom slightly left, floor tom slightly right, for a drummer's-eye perspective, or reversed for an audience perspective. Kick and snare almost always stay centered.
7. Add Reverb and Room Sound
A short room reverb on the snare, and sometimes a longer one blended subtly across the whole kit bus, adds depth without making the drums sound distant. Metal and hard rock mixes tend to use less reverb than pop or ballad-style tracks — you want punch and directness, not a big, washy space.
8. Bus Everything and Check the Balance
Route all your drum tracks to a single drum bus, apply light glue compression across the whole group if it needs it, and check the balance against a reference track you like the sound of. Listening on a second set of speakers or headphones catches problems your main monitors might be hiding.
Drum EQ Cheat Sheet
EQ is where most of the tonal shaping happens, and it's also where beginners get lost the fastest. Use this as a reference point, not a rulebook — every kit, room, and mic setup is different, and your ears are always the final judge.
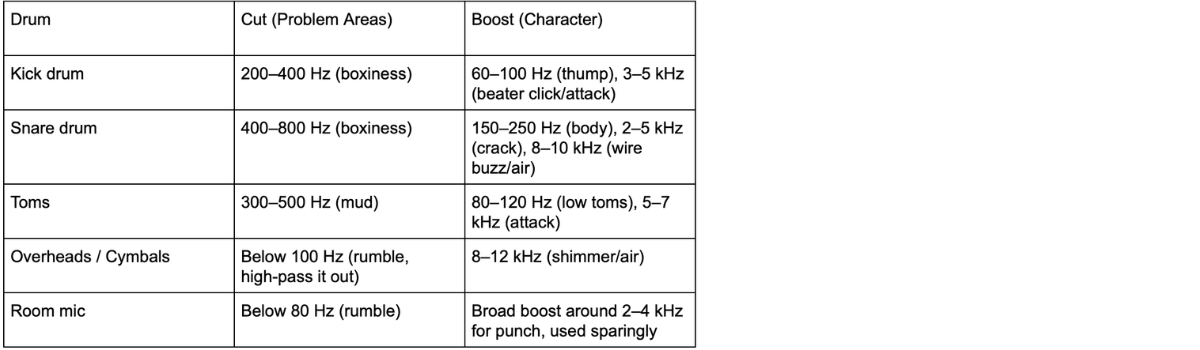
A high-pass filter on almost every track except the kick is one of the fastest ways to clean up a muddy drum mix — snares, toms, and overheads rarely need much information below 80–100 Hz, and cutting it out frees up space for the kick and bass guitar to do their job without competing.
Getting a Tight, Aggressive Kick and Snare for Rock and Metal
Metal and hard rock mixes ask more of the kick and snare than most other genres — fast double bass patterns and blast beats need a kick that's tight and articulate, not boomy, and a snare that cuts through heavily distorted guitars without getting buried.
Kick Drum for Speed and Clarity
Fast footwork gets muddy fast if the kick has too much low-end sustain. A shorter, more controlled kick sound — sometimes achieved with a bit of dampening at the source and a touch of gating in the mix — keeps rapid double bass and blast beat patterns readable instead of turning into a low rumble. Getting the shell itself dialed in first matters too; a kick that's already tuned to sound tight and controlled needs far less fixing at the mixing stage. If you're recording high-volume, high-speed parts regularly, a drum trigger can also help keep every hit consistent regardless of how hard or soft it was actually played.
Snare for Cut and Aggression
A snare that sounds great on its own can still disappear once distorted guitars come in. Boosting the 2–5 kHz range gives the snare the crack it needs to cut through a wall of guitars, and a slightly shorter, more controlled reverb keeps it feeling tight rather than washy.
Layering (Used Carefully)
Some metal productions blend a sampled kick or snare underneath the recorded one to add consistency and punch. This is a mixing choice, not a requirement — a well-recorded, well-mixed acoustic kit doesn't need it. If you do layer, keep the sample low in the mix; it should reinforce what's already there, not replace the character of the real performance.
Common Drum Mixing Mistakes
Boosting Before Cutting
Why it's wrong: Reaching for EQ boosts first tends to make problems louder instead of fixing them. A boxy snare boosted for more "crack" just becomes a louder, boxier snare.
How to fix it: Find and cut the frequencies that sound bad before you boost anything. Sweep an EQ band around slowly, listen for where it sounds worst, and cut there first.
Over-Compressing the Kit
Why it's wrong: Heavy compression on every individual track and the bus at once squashes the natural dynamics out of a performance. Ghost notes disappear, accents flatten out, and the kit loses the energy that made the take good in the first place.
How to fix it: Use compression with a purpose on each track — light on the kit overall, a bit heavier on room mics for a parallel effect — rather than stacking it everywhere out of habit.
Ignoring Bleed and Phase
Why it's wrong: Every mic on a drum kit picks up more than just its target drum. When those signals combine out of phase, frequencies cancel out and the kit can sound thin or hollow even though every individual track sounded fine solo.
How to fix it: Check phase alignment between your overheads and close mics (most DAWs have a polarity flip button), and listen to the full kit together, not just one track at a time, while you're mixing.
Skipping the Editing Stage
Why it's wrong: EQ and compression can't fix bad timing or stray noise between hits. Mixing on top of a messy edit just makes the mess more polished-sounding, not actually clean.
How to fix it: Do your editing pass before you touch a single plugin. A clean, well-timed performance is easier to mix and usually needs less processing overall.
Beginner Tips for Better Drum Mixes
- Reference a mix you love. Pull up a professionally mixed rock or metal track in your DAW and A/B against it regularly. It's the fastest way to catch when your kick is too boomy or your cymbals are too harsh.
- Mix at a moderate volume. Cranking the volume hides balance problems and fatigues your ears fast. I usually mix at a conversational volume and only turn it up occasionally to check impact.
- Take breaks. Your ears adjust to whatever you've been listening to. A five-minute break and a fresh listen will reveal problems you stopped noticing.
- Solo sparingly. A drum kit is meant to be heard together. Solo tracks to find specific problems, but make every real decision with the whole kit — and ideally the whole song — playing.
- Save presets, but don't rely on them. A starting EQ or compression preset can save time, but every kit and room is different. Use presets as a launchpad, not a final answer.
- Learn your room. If you're mixing on studio monitors in an untreated room, get familiar with how your mixes translate to headphones and other speakers before trusting your ears completely.
Final Thoughts
Mixing drums is a skill you build through repetition, not a formula you memorize once. The steps stay consistent — gain, edit, gate, EQ, compress, pan, blend — but how you apply them will shift with every kit, room, and song. Start with clean mic placement, work through the process in order, and trust your ears over any preset or cheat sheet, including this one.
The kits that sound huge on record aren't necessarily the best-played takes — they're the ones where every step of the mixing process, from the first mic placement to the final bus compression, was handled with intention. Put in the reps and that intention becomes second nature.
FAQ
What's the difference between mixing and mastering drums?
Mixing is balancing and shaping the individual drum tracks (and every other instrument) into a cohesive song. Mastering happens after the full mix is done, and it's a final pass on the whole track — not individual drum elements — to prepare it for release across different playback systems.
Do I need expensive plugins to mix drums well?
No. The stock EQ, compressor, and gate plugins in any modern DAW are capable of a professional-sounding drum mix. Technique and critical listening matter far more than which plugin brand you're using.
How many mics do I really need to record drums?
You can get a usable drum recording with as few as two overhead mics and a kick mic. More mics give you more control in the mix, but a well-placed minimal setup often sounds more cohesive than a poorly balanced eight-mic setup.
Why does my drum mix sound muddy?
Muddiness almost always comes from too much buildup in the 200–500 Hz range across multiple tracks at once. High-pass filtering tracks that don't need low end, and cutting boxy frequencies on the kick, snare, and toms, is the fastest fix.
Should I gate every drum track?
No. Gating is most useful on tom mics, which tend to pick up the most bleed from other drums. Kick and snare mics usually don't need gates if they're placed well and the surrounding tracks are edited cleanly.
Can I mix drums well with just headphones?
Yes, especially with a good pair of studio reference headphones, though it helps to check your mix on a second source — earbuds, phone speakers, car speakers — before calling it finished. Every playback system reveals different problems.