A marching snare drum is a high-tension, deep-shelled snare drum designed to be played while standing or marching, mounted on a carrier harness in front of the player's body and struck with heavier sticks at significantly higher head tension than a standard kit snare.
That definition covers the basics, but there's a lot more to it. Marching snares are a completely different playing experience from what most drummers expect — louder, harder, more demanding on technique, and tuned to a tension that would destroy a regular snare head. Whether you're thinking about joining a marching band, a drum corps, a pipe band, or you're just curious how marching percussion works, this guide covers everything you need to know.
We'll walk through what makes a marching snare different from a kit snare, the key components and how they work, how to hold the sticks and play basic strokes, how to tune a marching snare, the most common technique mistakes beginners make, and practical tips for getting started. By the end, you'll have a clear picture of what marching snare drumming actually demands and what it takes to get good at it.
When you’re done reading, you will be familiar with:
- What Is a Marching Snare Drum?
- Marching Snare vs. Drum Kit Snare: Key Differences
- Parts of a Marching Snare Drum
- Types of Marching Snare Drums
- How to Tune a Marching Snare Drum
- Common Mistakes Beginners Make
- Beginner Tips for Marching Snare Players
- Final Thoughts
- FAQ
What Is a Marching Snare Drum?
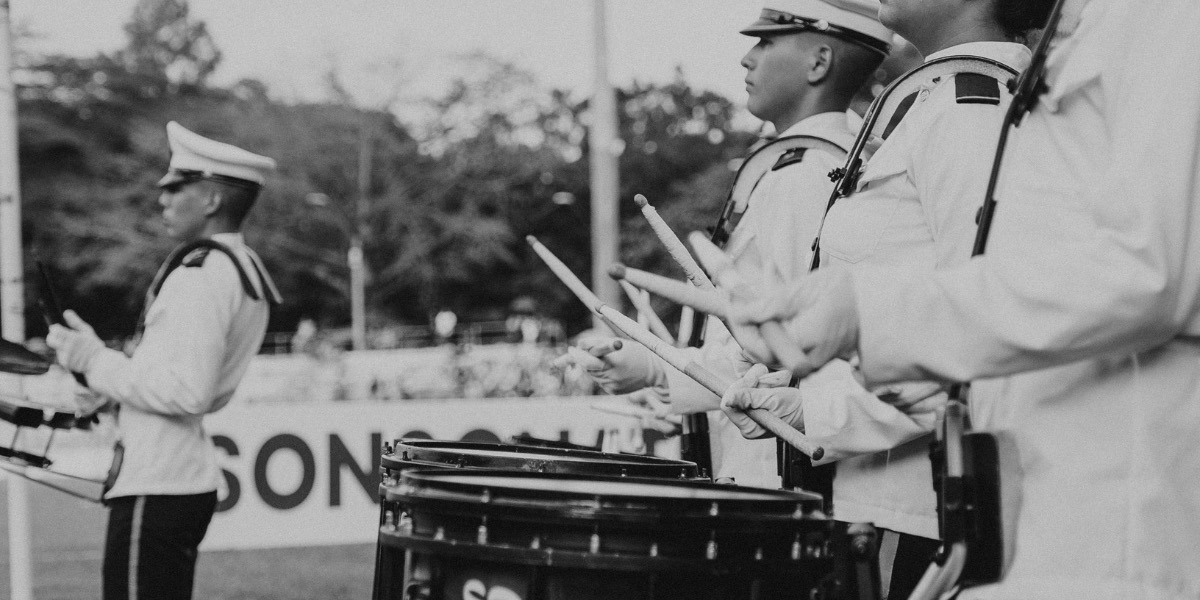
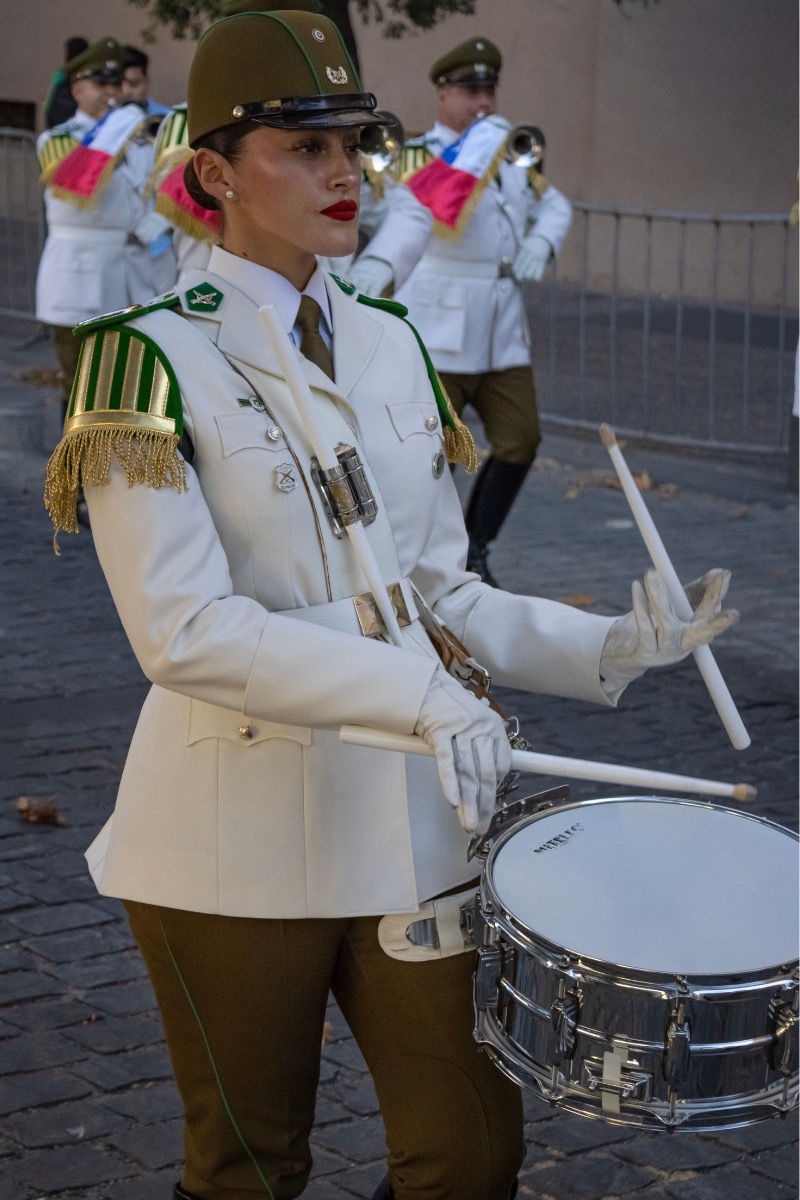
A marching snare drum is purpose-built for performance in motion. Unlike a drum kit snare that sits on a stand at a fixed height and angle, a marching snare is mounted on a carrier — a padded harness system that suspends the drum in front of the player at roughly waist height, angled slightly toward the player for better stick access.
The fundamental job of a marching snare drum is to project loudly enough to be heard clearly outdoors, across a football field or parade route, without amplification. That requirement shapes everything about how it's designed: the deeper shell, the heavier hardware, the high-tension heads, and the weight of the sticks used to play it.
Marching snare drums appear in a wide range of contexts:
- Marching bands — high school, college, and independent bands competing in field shows and parades
- Drum and bugle corps (DCI/WGI) — elite competitive marching ensembles with highly choreographed percussion sections
- Pipe bands — Scottish and Irish tradition, typically paired with bagpipes
- Military and ceremonial drumming — military marching traditions worldwide
- Rudimental drumming — a style and tradition of solo and ensemble snare drum performance rooted in military percussion history
Marching percussion has its own deep technical tradition, its own notation conventions, and its own skill set that overlaps with kit drumming in some areas and diverges sharply in others. Many great drummers started on marching snare — the discipline and stick technique it builds translates directly to the kit.
Marching Snare vs. Drum Kit Snare: Key Differences
If you've only played a kit snare, a marching snare will feel like a completely different instrument the first time you pick up sticks and play it. Here's a direct comparison of the main differences:
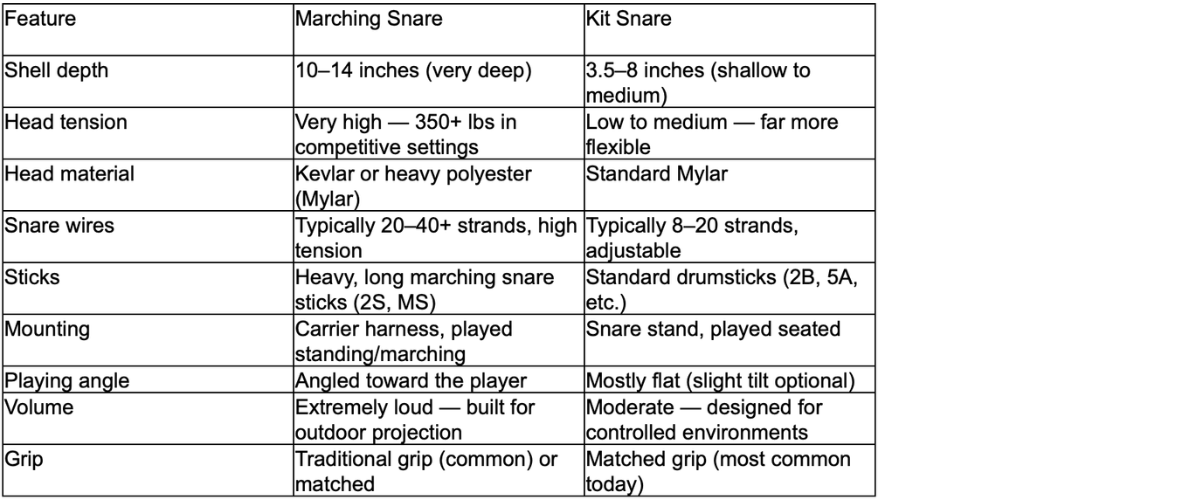
The biggest practical difference is head tension. A kit snare batter head at normal tuning is under maybe 40–80 lbs of tension. A competitive marching snare head is often tuned to 350–400 lbs or more. That's not a typo. The result is a drum that sounds like a cracking whip and requires a different kind of arm and wrist engagement to play properly.
The deep shell on a marching snare also means the drum has significant weight — a high-end marching snare can weigh 10–14 lbs before the carrier, compared to 5–8 lbs for a typical kit snare. Playing it for a 30-minute field show requires physical conditioning that kit drummers don't usually train for.
Parts of a Marching Snare Drum
Understanding the components helps when tuning, maintaining, or shopping for a marching snare. The parts are similar to a kit snare but heavier-duty throughout:
- Shell: Usually wood (maple, birch, or composite) or aluminum. Deep shells — 10 to 14 inches — give the drum its volume and projection. Aluminum shells are lighter; wood shells are warmer.
- Batter head: The top head you strike. Competitive drums typically use Kevlar heads (Evans, Remo) that can withstand extreme tension without breaking. Practice drums may use heavy Mylar heads.
- Resonant (snare-side) head: The bottom head, much thinner than the batter. Snare wires run across it.
- Counter hoop (rim): The hoop that holds the batter head in place. Marching snare hoops are significantly heavier than kit snare hoops to withstand the high tension and rim shots common in marching technique.
- Tension rods and lugs: More numerous and heavier than kit snare hardware. Some competitive drums have 10, 12, or even 16 lugs per head for maximum tuning precision and tension distribution.
- Snare strainer and butt plate: Same function as a kit snare — engage/disengage the wires — but built much more robustly. The strainer throw-off on a marching snare has to hold tension under extreme playing conditions without loosening mid-performance.
- Snare wires: Typically 20–40 strands. More strands give a crisper, brighter snare sound at high tension.
- Carrier attachment points: Brackets or hooks on the sides and bottom of the shell that connect to the carrier harness system.
Types of Marching Snare Drums
Not all marching snares are the same. The major distinctions come down to intended use level and construction:
Marching Band / Educational Level
These are the drums used in most high school and many college programs. They prioritize durability and affordability over ultimate performance. Typical specs: wood or composite shell, heavy Mylar heads, standard marching hardware. Brands like Pearl, Ludwig, and Yamaha make solid educational-level marching snares in the $400–$800 range. These drums are robust, easy to service, and designed to survive years of heavy use by multiple players.
Competitive / World Class Level
Used by top-tier college bands, independent drum corps (DCI), and WGI percussion groups. These drums feature Kevlar heads, precision-machined hardware, lighter weight shells without sacrificing strength, and extremely tight manufacturing tolerances. Brands like Pearl Championship, Dynasty, and Yamaha SFZ are well-known at this level. Cost ranges from $800 to over $2,000 per drum.
Pipe Band Snare
Designed specifically for Scottish and Irish pipe band tradition. These tend to have longer shells (up to 16 inches) and use a traditional tuning and snare wire setup that produces a distinctive buzzy, open sound quite different from modern marching corps style. The playing technique and musical context are also different — pipe band drumming has its own deeply specific tradition and notation system.
Rudimental / Solo Snare
competitions and recitals. These can be standard or marching-configuration snares. The playing style emphasizes the traditional 26 standard rudiments and extensions of them, executed with extreme precision and dynamic control.
How to Hold and Play a Marching Snare Drum
Marching snare technique is a deep subject — dedicated method books and years of instruction are the real path to mastery. What follows is a solid introduction to the fundamentals.
Stick Selection
Standard drumsticks used for kit playing aren't appropriate for marching snare. You need heavier, longer marching snare sticks. Common designations include:
- 2S: The standard all-purpose marching stick. Heavier and longer than a 2B, suitable for most programs.
- MS (Multi-Surface): Similar weight to 2S, slightly different taper. Common in competitive programs.
- Pipe band sticks: Shorter and heavier still, with a larger bead. Used exclusively in pipe band contexts.
Using standard kit sticks on a high-tension marching head doesn't give you the right rebound characteristics and can feel jarring on your joints. The right marching stick makes the difference between playing efficiently and fighting the drum.
Grip: Traditional vs. Matched
Marching snare has a strong historical association with traditional grip — the left hand holds the stick underhand, resting in the webbing of the thumb and across the ring finger, with the wrist rotating to produce the stroke. This grip originated in military drumming where the drum was carried at an angle on a sling, making a matched grip awkward. Today, many competitive programs use matched grip exclusively, and some use both depending on context.
If you're already a kit player, you likely already know what traditional grip involves. On a marching snare angled toward you on a carrier, traditional grip actually feels natural in a way it doesn't always on a flat kit snare. Both grips are valid — use what your program requires, or what your instructor teaches.
Basic Stroke Types
Marching percussion has a formalized vocabulary of strokes, each with specific stick height requirements. The core strokes every beginner needs to know:
- Full Stroke: Stick starts high (90 degrees from head surface), strikes, and rebounds back to the same high position. Maximum volume and rebound.
- Down Stroke: Stick starts high, strikes at full velocity, but finishes low (about 3 inches from the head). Produces a loud note followed by the stick's ready position for a soft note.
- Tap Stroke: Stick starts and ends at low position (3 inches). Soft note. The workhorse of dynamic contrast.
- Up Stroke: Stick starts low, strikes at low velocity, but finishes high. Produces a soft note followed by the stick's ready position for a loud note.
These four strokes are the foundation of the Moeller technique and most modern marching percussion instruction. The key concept is that stick height at the start of the stroke determines volume — high position means loud, low position means soft. This is a more explicitly codified version of what kit drummers learn intuitively over time.
Rim Shots and Rim Clicks
The crisp "crack" you hear from top-level marching snare sections comes largely from precise rim shots — the stick tip striking the head while the shaft simultaneously contacts the metal counter hoop. Getting a consistent, clean rim shot on every stroke at any dynamic level is a major technical goal in marching percussion. It requires precise stick angle and consistent stroke mechanics.
How to Tune a Marching Snare Drum
Tuning a marching snare is more intense than tuning a kit snare — the tensions involved are dramatically higher, and the goal is a dry, cracking sound rather than the warm, resonant tone of a kit snare. Here's the fundamental process:
Getting Even Head Tension
The principle is the same as kit snare tuning: star pattern, quarter-turns, work toward even pitch at every lug. The main difference is the amount of torque involved. At high tension, a quarter turn does less than it would on a loosely tuned head, and you'll be making significantly more passes around the drum to reach playing tension.
Most educational marching snares should be tuned to a clear, bell-like pitch with no wrinkles in the head and a very firm batter surface. Competitive drums push much further than that — toward tension levels where the head almost rings like a high-pitched tom instead of a snare.
Snare Wire Tension on a Marching Drum
Marching snare wires are typically tensioned much tighter than kit snare wires. The goal is a crisp, bright, immediate response with very little sustain — the snare should crack and stop, not buzz and ring. Adjust the strainer until the wires snap cleanly on a firm stroke with no excess buzz, then test at various dynamic levels to make sure soft notes still activate the snare.
Tuning Within a Section
In a marching percussion section, every snare drum should sound as close to identical as possible. This is called "matching the line." A section leader or drum instructor will typically set a reference drum first, and each drum in the section is tuned to match it — checked by ear and sometimes by electronic tuner. If you're tuning for a group context, individual preference takes a back seat to ensemble consistency.
Common Mistakes Beginners Make
Using Kit Sticks Instead of Marching Sticks
Why it's wrong: Kit sticks are too light and too flexible for high-tension marching heads. You'll get poor rebound, inconsistent tone, and your technique will suffer because the stick response is wrong for the application. You may also damage kit sticks faster since they're not designed for this level of tension.
How to fix it: Get proper marching snare sticks — 2S or MS designation from any major brand (Vic Firth, Innovative Percussion, Promark). Your school or program may specify a particular model for section uniformity.
Burying the Stick in the Head
Why it's wrong: A high-tension marching head has significant rebound. Many beginners "push" through the stroke and bury the stick tip into the head instead of letting it rebound naturally. This kills the tone, slows your playing speed, and is physically exhausting over time.
How to fix it: Let the head push the stick back. Think of the stroke as dropping the stick from a height rather than pressing it down. Practice slow, controlled strokes and pay attention to what the head is doing after contact — it should push the stick back to the ready position effortlessly.
Ignoring Stick Height
Why it's wrong: In marching percussion, stick height isn't just a visual concern — it's how you communicate dynamic level to both the drum and the ensemble. Playing everything at the same height means every stroke is the same volume, which eliminates dynamic contrast and makes ensemble playing impossible to coordinate visually.
How to fix it: Practice in front of a mirror. Check that your stick heights match the stroke type: taps at 3 inches, full strokes at 90 degrees. Use a metronome and alternate between dynamic levels, focusing on maintaining correct stick height at each level before worrying about speed.
Over-Tensioning the Snare Wires
Why it's wrong: Tightening the snare wires too much chokes the drum and produces a thin, strangled crack instead of a full, bright snap. It also kills soft note response — ghost notes and taps won't properly activate the wires.
How to fix it: Tension the wires to the point where they snap cleanly and lie flat against the resonant head, then test at soft dynamics. If quiet notes don't speak, back the wires off slightly. The snare should respond to the lightest tap at normal height.
Neglecting Core and Arm Conditioning
Why it's wrong: Carrying a 10–14 lb drum on a carrier harness and playing it for 30–60 minutes at a time is physically demanding in a way that sitting at a kit is not. Beginners who jump into marching percussion without building up their endurance often develop soreness, fatigue-related technique breakdown, or injuries to their shoulders, wrists, and lower back.
How to fix it: Build up playing time gradually. Start with 10–15 minutes of carrier wear and playing per session, increase incrementally. Core strengthening exercises help significantly — the carrier transfers a lot of load through your core and lower back. Don't wait until the first full rehearsal to discover what your body isn't ready for.
Beginner Tips for Marching Snare Players
- Learn rudiments first. Marching snare technique is fundamentally rudiment-based. Before you worry about advanced orchestrations or show music, get the core rudiments — single stroke roll, double stroke roll, paradiddle, flam, drag — clean and consistent at a variety of tempos. Strong rudiments are the foundation everything else is built on, and the basics are worth mastering properly.
- Practice on a practice pad first. You don't need to be on a full marching snare to build technique. A good practice pad (ideally one that simulates the firm, high-tension response of a marching head) lets you work on stroke mechanics, stick height, and rudiments without disturbing anyone. I'd recommend working on a pad for at least a few weeks before your first serious session on the drum.
- Use a metronome consistently. Marching percussion is as much about timing as anything. Every practice session should involve a metronome. Start slow enough that every stroke is clean and controlled, then increase tempo only when that's genuinely true — not before.
- Listen to drum corps recordings. The top DCI and WGI ensembles set the standard for what marching snare playing can sound like. Listening to Blue Devils, Cavaliers, or Santa Clara Vanguard — even just to the snare sections — gives you a sonic target that's much more vivid than any written description can provide.
- Find a good instructor. Marching snare technique is much harder to self-teach than kit drumming. The specific physical mechanics of correct stroke technique benefit enormously from in-person feedback. If your school has a marching band program, the percussion instructor is your best resource. If not, even a few sessions with a local marching percussion teacher can set you on the right path.
- Respect the weight. Marching snare drums are heavy and the carriers are not always comfortable for new players. Don't skip the carrier padding adjustments — fit it properly before any extended playing. An incorrectly fitted carrier puts pressure in the wrong places and can lead to numbness or soreness in your shoulders and hips.
Final Thoughts
Marching snare drumming is one of the most technically demanding styles in all of percussion — and also one of the most rewarding. The discipline it builds in timing, stroke control, and ensemble awareness transfers directly to any other drumming context. A lot of the world's best studio and touring drummers have marching band roots, and it shows in their precision and consistency.
If you're coming from a drum kit background, the main adjustment is understanding that marching snare is a completely different physical instrument that requires its own technique, its own equipment, and its own approach to tuning. The transferable skills (timing, rudiments, basic stick mechanics) are real, but don't assume that being a good kit player automatically makes you a good marching player — or vice versa.
Start with the fundamentals: get the right sticks, learn the four basic strokes, work rudiments at slow tempos until they're clean. The rest builds from there.
FAQ
Can I use a regular snare drum for marching?
Not effectively. A standard kit snare isn't designed to handle marching-level head tension, the hardware isn't built for carrier attachment, and it won't project loudly enough for outdoor performance. If you're serious about marching percussion, you need a drum designed for it. For occasional practice or casual use, a kit snare mounted on a stand can be used to learn rudiments, but it's not a substitute for the real thing.
What sticks should I use for marching snare?
Dedicated marching snare sticks — typically 2S or MS designation. They're heavier and longer than standard kit sticks, with a different taper and tip shape optimized for marching head response. Popular options include Vic Firth MS5 and MS2, Innovative Percussion FS Series, and Promark's marching line. If you're in a school program, your director will likely specify a particular model for section consistency.
How loud is a marching snare drum?
Very loud. A single marching snare at full stroke, unmiked, can reach 110–120 dB at playing position — comparable to a chainsaw. A full marching snare line performing together can be significantly louder. Hearing protection is strongly recommended for any extended practice or performance, especially in enclosed rehearsal spaces.
Is marching snare harder than playing a drum kit?
They're different kinds of difficult. Marching snare requires more physical endurance, more precise stick technique, and a more specific approach to dynamics and timing. Kit drumming requires coordination between four limbs and musical responsiveness across a wide range of contexts. Many drummers find that marching percussion builds the stick technique and precision that kit drumming doesn't always develop as explicitly.
What is the difference between a marching snare and a tenor drum?
A marching snare drum is a single drum with snare wires that produces the characteristic snare crack. A tenor drum (sometimes called a "quint" or "quads" in marching percussion) is a multi-drum setup — typically four or five unsnared drums of different pitches tuned to melodic intervals. Tenor players carry several drums on a wider carrier and play melodic/harmonic parts. The two instruments require quite different skills.
What's the best marching snare drum for beginners?
For educational and beginner use, the Pearl Championship Maple, Yamaha MSS series, and Ludwig Legacy Acrolite marching snare are well-regarded starting points. These drums are durable, consistently built, and used in school programs worldwide. Avoid cheap no-name marching snares — the hardware quality on budget drums often can't hold the tension needed for proper marching setup and may fail under playing conditions.
Do I need to know rudiments to play marching snare?
Yes — rudiments are the core technical vocabulary of marching snare. The 26 standard American rudiments (single stroke, double stroke, paradiddles, flams, drags, rolls) form the building blocks of virtually all marching snare music. You don't need to have them all mastered before you start, but serious work on the basics needs to happen early. Building a solid rudiment foundation makes everything else dramatically easier.