The Glyn Johns technique is a 3-microphone drum recording method that uses two overhead mics placed at specific distances and angles — one above the kit, one to the right of the floor tom — plus a kick drum mic. When set up correctly, the phase relationship between the two overheads creates a naturally wide, balanced stereo image without needing close mics on every drum.
It's one of those techniques that sounds simple until you actually try it, because the mic placement has to be precise to work. But when it clicks, it produces a sound that engineers have chased for decades — full, open, and natural, like the drums are in the room with you. Glyn Johns developed it in the late 1960s and used it on records by The Who, The Rolling Stones, The Eagles, and Led Zeppelin. That's a pretty convincing track record.
In this guide, we'll break down exactly how the technique works, why the phase alignment matters, how to position all three mics step by step, what to do if your snare sounds off-center, and how the modified "Recorderman" variation compares. By the end, you'll know how to set this up yourself and what to listen for when it's working right.
When you’re done reading, you will be familiar with:
- What the Glyn Johns Technique Actually Is
- Why Phase Alignment Is the Whole Game
- Which Mics to Use
- Step-by-Step Setup
- Fixing the Snare Position in the Mix
- Glyn Johns vs. Recorderman Technique
- Common Mistakes and How to Fix Them
- Beginner Recording Tips
- Final Thoughts
- FAQ

What the Glyn Johns Technique Actually Is
Most modern drum recordings use a lot of microphones — kick in, kick out, snare top, snare bottom, hi-hat, a mic on every tom, two overheads, room mics. You can easily have 12–16 channels just for drums. The Glyn Johns technique strips that right back to three mics, and does it in a way that doesn't sound like a compromise.
The three mics are:
- Overhead mic (Mic 1): Positioned above the kit, roughly over the drummer's shoulder, looking down at the snare. This captures the full kit from above — kick, snare, hi-hat, and ride.
- Side mic (Mic 2): Positioned to the right side of the kit, roughly at snare height, pointing across the kit toward the snare from beside the floor tom. This captures a side-on perspective — floor tom, kick, and snare from a different angle.
- Kick mic (Mic 3): A standard kick drum mic inside or just outside the kick drum port.
The overhead and side mic are panned hard left and right respectively in the mix. Because they're placed at equal distances from the snare drum, the snare hit arrives at both mics at exactly the same time. That phase coherence is what makes the technique work — the snare stays tight and centered in the stereo image rather than smearing or sounding thin.
Why Phase Alignment Is the Whole Game
When two mics capture the same sound source at different distances, the sound arrives at slightly different times. In a mix, this creates phase cancellation — frequencies start to cancel each other out, which is why drums recorded with misaligned mics can sound thin, hollow, or "phasey." It's one of the most common problems in home drum recording.
The Glyn Johns technique solves this by making sure both overhead mics are equidistant from the snare drum. The snare is the loudest, most central element of the kit, so keeping it in phase means the whole mix holds together. When the snare hit is perfectly in phase between the two mics, it appears centered and solid, even though neither mic is directly above it.
This is also why you can't just eyeball the mic placement and hope it works. The distance from each mic capsule to the center of the snare batter head has to be measured and matched. A few inches of difference can noticeably affect the snare sound. Use a piece of string or a tape measure — there's no shortcut here.
Which Mics to Use
Glyn Johns originally used large-diaphragm condensers, and that's still the natural first choice. You want mics with a wide, flat frequency response and good transient handling — the kit moves a lot of air, and the overheads need to capture it cleanly.
Common mic choices for this technique:
- Large-diaphragm condensers (matching pair): AKG C414, Neumann U87, Audio-Technica AT4050. Warm, full, classic overhead sound. A matched pair ensures both mics have identical frequency responses.
- Small-diaphragm condensers: Rode NT5, Shure SM81, AKG C451. More precise transient response, slightly brighter. Great if you want more detail on cymbals and hi-hat.
- Kick mic: AKG D112, Shure Beta 52A, Audix D6. Any decent dynamic designed for kick will work.
You don't need an identical pair for the two overhead positions. The overhead and side mics serve different purposes in the image, so having slightly different mics is fine — and in some cases preferred. What matters more than the specific mic is consistent polar pattern and a flat enough response to capture the full frequency range of the kit.
If you only have one good condenser and a couple of dynamics, start with what you have. The technique still works; you're just optimizing within your available gear.
Step-by-Step Setup
Get the placement right before you worry about levels. A well-placed mic at the wrong gain is easier to fix than a poorly-placed mic at perfect gain.
1. Set Up and Tune the Kit First
Record what the kit actually sounds like, not what you hope it sounds like. Make sure the kit is fully tuned before any mics go up. A drum that sounds good acoustically in the room will translate well to this technique. A poorly tuned kit will just give you a cleaner recording of a bad-sounding drum — worth reading up on how to tune your drums if this is a first-time setup.
2. Place Mic 1 — The Overhead
Stand behind the kit, from the drummer's perspective. Position Mic 1 roughly above and slightly in front of the snare drum, angled downward to point at the snare. The capsule should be approximately 3–4 feet above the snare batter head. You're aiming for a spot where the mic can "see" the whole kit — hi-hat on the left, ride and floor tom on the right, snare below.
Use a cardioid polar pattern. Point it straight down or at a slight angle toward the snare — avoid tilting it toward the cymbals unless you specifically want more cymbal presence.
3. Measure the Distance from Mic 1 to the Snare
This is the critical step. Take a piece of string (or a tape measure) and run it from the capsule of Mic 1 to the center of the snare drum batter head. Note that exact distance — call it D.
4. Place Mic 2 — The Side Mic
Move to the right side of the kit (from the drummer's perspective). You want Mic 2 to be positioned roughly beside the floor tom, at approximately snare height, pointing inward across the kit toward the snare. The exact height and angle can vary — the only hard constraint is this: the distance from Mic 2's capsule to the center of the snare batter head must equal D, the same distance you measured from Mic 1.
Adjust the mic stand up or down, and move it closer or further until your tape measure reads the same distance as Mic 1. Take your time here — this is the whole technique.
5. Place the Kick Mic
Place your kick mic inside the port of the front resonant head (if there's a hole cut), aimed at the beater impact point on the batter head. If the front head is sealed, position the mic just outside the front head, slightly off-center. This mic won't be panned — it stays in the center of the mix for low-end punch.
6. Set Levels and Check Phase
Bring all three mics up in your DAW. Pan Mic 1 full left and Mic 2 full right. Play the kick and snare together and listen. The snare should sound centered, solid, and punchy. If it sounds hollow, thin, or weird, check your measurements — one mic is probably slightly farther from the snare than the other.
A quick phase check: mute Mic 2, listen to Mic 1 alone. Then un-mute Mic 2. The kick and snare should get louder and fuller, not thinner. If they get thinner or "smaller" when Mic 2 is added, you have a phase problem — re-measure the distances.
Fixing the Snare Position in the Mix
One common complaint with the Glyn Johns technique is that the snare can appear slightly off-center to the left — because Mic 1 (panned left) is positioned more directly above the snare, while Mic 2 (panned right) is off to the side. The snare is louder in the left channel.
A few ways to address this:
- Adjust the pan positions: Instead of hard left/right, try pulling both mics slightly toward center — maybe 80% rather than 100%. This tightens the image without losing stereo width.
- Volume adjust: Bring Mic 2 up slightly in level to match the snare volume between channels. Even a 1–2 dB nudge can center the snare.
- Add a snare close mic: If centering is critical, add a fourth mic (snare top) strictly for snare center reference, blended in lightly underneath the overheads. This is how many engineers use the technique on professional sessions.
Some engineers embrace the slight left-lean of the snare as part of the sound's character. Listen to the Eagles' Hotel California — the drums have a raw, slightly asymmetrical quality that's part of what makes them sound real and human. If it bothers you, fix it. If it doesn't, leave it.
Glyn Johns vs. Recorderman Technique
The Recorderman technique is a close cousin that gets confused with Glyn Johns often. Both use two overheads with phase-matched distances to the snare. The key difference is mic positioning:
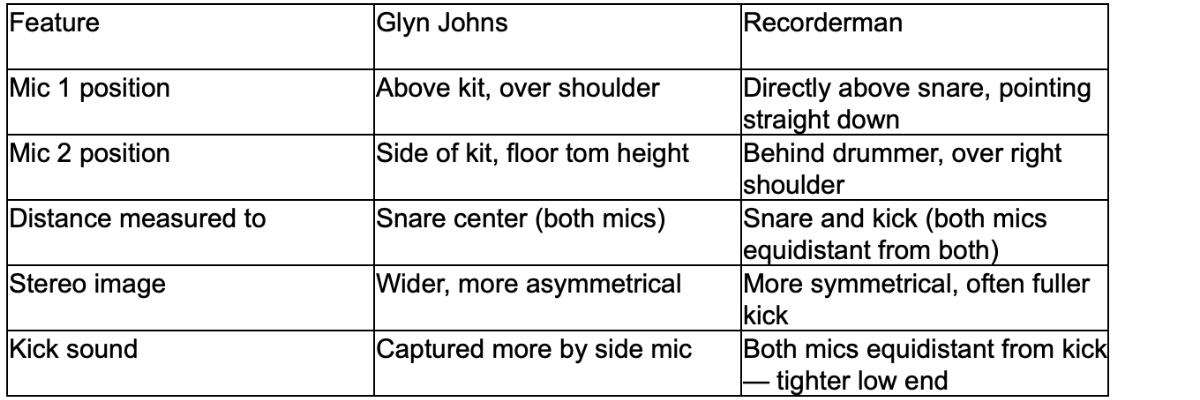
Recorderman often produces a slightly more centered, "modern" sound, while Glyn Johns gives you that classic wide, vintage feel. Neither is objectively better — they're different tools. If you're going for a '70s rock sound, start with Glyn Johns. If you want a tighter, more symmetrical image, try Recorderman.
Common Mistakes and How to Fix Them
Not Measuring the Distance — Eyeballing It Instead
Why it's wrong: The entire technique depends on phase coherence between the two overheads. Even a 2–3 inch difference in mic-to-snare distance creates audible phase issues. Eyeballing almost always introduces this error.
How to fix it: Always use a tape measure or string. Measure from the capsule (not the body of the mic) to the center of the snare batter head for both mics, and match them exactly before recording a single note.
Placing the Side Mic Too High or Too Low
Why it's wrong: The side mic position affects how much floor tom and kick it captures. Too high and the floor tom gets lost; too low and the mic starts picking up more floor reflections and less of the kit directly.
How to fix it: Start with the side mic at roughly snare height — somewhere between the snare and the top of the floor tom. Adjust by ear, but maintain the equal distance to the snare. Height is secondary to distance accuracy.
Setting Levels Before Checking Phase
Why it's wrong: Gain staging before verifying phase means you might spend time dialing in levels on a setup that's already compromised. Phase issues don't get better with better gain — they just become well-leveled problems.
How to fix it: Get both overheads up at unity, pan them, play the kit, and do the phase-flip test first. Add the kick mic and do a rough level check. Then — and only then — start adjusting gain for optimal headroom.
Blaming the Technique When the Room Is the Problem
Why it's wrong: The Glyn Johns technique is more sensitive to room acoustics than a heavily close-miked setup. In a small, reflective room with bare walls and a concrete floor, the overheads pick up a lot of ugly room sound that you can't EQ out.
How to fix it: Add some absorption to the room before recording — even moving blankets hung on walls, or recording in a carpeted space, makes a noticeable difference. The technique was designed for live recording rooms with some natural ambience, not bare bedrooms.
Beginner Recording Tips
- Start with fewer mics, not more. It's tempting to add close mics on every drum "just in case." Resist this for your first few sessions with this technique. Learn what the Glyn Johns sound actually is before you start blending other mics into it.
- Record a reference hit before committing. Play a consistent snare hit, listen back, flip the phase on Mic 2 and listen again. Whichever sounds fuller and more solid is the correct phase orientation.
- The kick mic needs a high-pass on the overheads. Roll off the low end on both overhead mics below about 80–100 Hz. The kick mic handles the low end — letting the overheads pass it just muddies the mix.
- Don't over-compress the overheads. The natural dynamics of a drumkit are part of the Glyn Johns sound. A gentle 2:1 ratio with a slow attack lets the transients breathe. Squashing them defeats the purpose of a minimal-mic approach.
- Try different snare positions under Mic 1. Moving the snare an inch or two toward or away from center under the overhead changes the tonal balance without any processing. Small physical adjustments can do more than EQ.
- Check mono compatibility. Sum both overhead channels to mono and listen. Good phase alignment means the drums still sound full and punchy in mono. If they collapse or thin out, your distances aren't quite equal yet.

Final Thoughts
The Glyn Johns technique rewards patience at the placement stage. Spend the time to measure accurately, check your phase, and get the room sounding as good as you can before hitting record. Once those fundamentals are in place, you'll get a drum sound that holds up better than most heavily processed multi-mic recordings — because it's capturing the kit as a whole instrument rather than a collection of individual drums stitched together in post.
Three mics. Equal distances. Trust your ears. That's the whole technique, and it's been making great drum recordings for over fifty years.
FAQ
How many mics does the Glyn Johns technique use?
Three mics: one overhead above the kit, one side mic positioned near the floor tom, and one kick drum mic. Some engineers add a snare close mic as an optional fourth channel for more control over the snare center position.
Why does the snare sound off-center with Glyn Johns?
Because Mic 1 (panned left) is positioned closer to directly above the snare, the snare tends to sit slightly louder in the left channel. This can be corrected by adjusting pan positions toward center, nudging Mic 2 level up slightly, or blending in a center snare mic.
Do both mics need to be the same model?
No. The critical requirement is equal distance from each mic capsule to the snare center. Using two different mics (even a condenser and a dynamic) will work — though matching the same capsule type gives more consistency in the frequency response of the stereo image.
What's the difference between Glyn Johns and Recorderman?
Both use two overhead mics with phase-matched distances to the snare. Glyn Johns places the second mic at the side of the kit at floor-tom height, creating a wider, more asymmetrical stereo image. Recorderman places it behind the drummer, over the right shoulder, and also matches the distance to the kick drum — producing a tighter, more symmetrical result.
Can I use the Glyn Johns technique in a home studio?
Yes, but the room matters more than with close-miked setups. Add absorption to reflective surfaces before recording. The technique was designed for live recording environments with natural ambience, so a completely dead room or a very reflective one can both cause problems.
Does the Glyn Johns technique work for all genres?
It's particularly well-suited to rock, classic rock, country, and Americana — anywhere a natural, "live room" drum sound is desirable. It's less common in modern pop or metal production, where heavily processed close mics and triggered samples are the norm. But it's a useful technique to understand regardless of genre.


