To use a drum key, fit its square socket over a tension rod, turn clockwise (as you look down at the rod) to tighten and counterclockwise to loosen, and always work across the drum in a star pattern in small, equal turns so the head tensions evenly.
That's the whole mechanical idea, but the drum key is the one tool that decides whether your kit sounds focused or sloppy. Hard-hitting rock and metal playing puts heavy stress on heads, rods, and hardware, so a kit drifts out of tune faster than most drummers expect. If you only grab the key when something sounds awful, you're always playing catch-up.
In this guide, you'll learn what a drum key is and which type to buy, how to turn it correctly, how to tune a head step by step, and what else on your kit the key tightens. We'll also cover the mistakes that strip rods and warp hoops, plus the habits that keep a loud, fast kit sounding consistent from the first song to the last.
When you’re done reading, you will be familiar with:
- What exactly is a drum key?
- Which type of drum key should you use?
- How do you turn a drum key correctly?
- Step by step: tuning a drum with a key
- What else does a drum key tighten?
- Keeping a hard-hitting kit in tune
- Common drum key mistakes
- Beginner tips
- Conclusion
- FAQ

What Exactly Is a Drum Key?
The drum key is small, but understanding what it does makes every other tuning decision easier. It is the tool that changes tension on your drumheads, and tension is what sets pitch, sustain, and attack.
A standard drum key is a T-shaped or L-shaped handle with a square socket on one end. That socket fits the square head of a tension rod, the bolt that runs through the hoop (rim) into a lug bolted to the shell. Tightening the rod pulls the hoop down, which stretches the head over the bearing edge and raises the pitch. Loosening does the opposite.
The standard key fits the tension rods on most modern snares, toms, and bass drums, so one key usually covers a whole kit. The exception is older hardware: some vintage drums use smaller rod heads that a standard key is too big for, so if a rod doesn't seat snugly, don't force it. If you're not sure how all these pieces fit together, our breakdown of the parts of a drum set shows where lugs, hoops, and rods sit on each drum.
Which Type of Drum Key Should You Use?
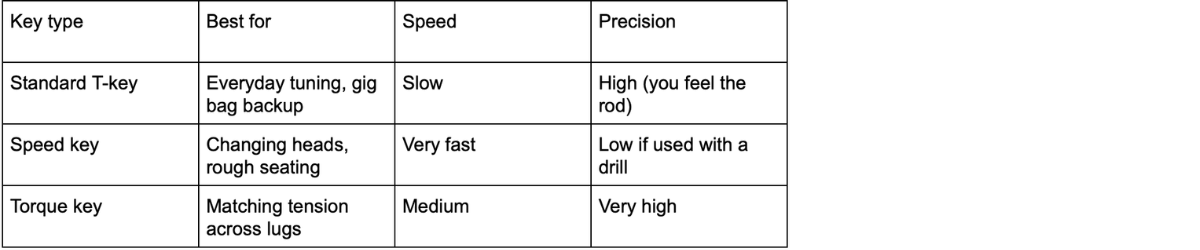
Every key is built to turn the same rods, but they differ a lot in speed, feel, and precision. Picking the right one saves real time when you're changing heads or tuning a full kit before a gig.
Standard T-Key
The basic key that ships with most kits. It's cheap, small, and reliable. The downside is speed: every turn means rotating your whole wrist, so a full kit takes a while.
Speed Key (Ratcheting or Drill-Compatible)
A speed key has a ratchet handle or a hex shank that fits a cordless drill. It's brilliant for removing and seating heads quickly. I use one for finger-loosening and rough seating, but I always finish by hand, because a drill has no feel and can strip a rod in a second.
Torque Key
A torque key clicks or slips at a preset tension, so every rod ends up tightened by the same amount. It's a great tool for even tension, especially on a bass drum with many lugs.
Digital Tuners (Not a Key, But Worth Knowing)
Devices such as a tension gauge or drum tuner measure head tension or pitch at each lug. You still use a key to make the adjustment, but the tuner tells you whether the lugs match.
How Do You Turn a Drum Key Correctly?
Turning the key is simple, but the direction and size of each turn matter more than most beginners realize. Get these basics right before you touch the first rod.
Direction
Think "righty-tighty, lefty-loosey." Looking down at the rod head, clockwise tightens and counterclockwise loosens. That's true for the vast majority of tension rods on standard kits.
Size of Each Turn
Use quarter turns or smaller for fine tuning. Big jumps unbalance the head and make it hard to hear what changed.
The Star Pattern
Never tighten lugs in a circle. Work across the drum in a star (criss-cross) pattern. On an eight-lug drum, that means lug 1, then the one opposite, then a lug about a quarter of the way around, then its opposite, and so on. The star keeps the hoop level and stops the head from wrinkling on one side.
Step by Step: Tuning a Drum With a Key
This is the core routine. Follow it on any snare or tom, and repeat it whenever a head feels dead or uneven. The process is the same whether you're tuning a fresh head or just refreshing an old one.
- Loosen everything. If you're seating a new head, back all rods off until you can turn them with your fingers.
- Finger-tighten each rod. Turn every rod until it just touches the hoop. Don't use the key yet. This ensures every lug starts at the same point.
- Seat the head. Press the palm of your hand into the center of the head with moderate pressure. You may hear cracking, which is the glue ring settling. That's normal.
- Add tension with the key. Give each rod a half turn in the star pattern, then a quarter turn, until the head is wrinkle-free and has a basic tone.
- Check pitch at each lug. Lightly tap about an inch from each rod while gently muting the center with a finger. Listen for the same pitch at every lug.
- Fix the outliers. If one lug sounds lower, tighten it a small amount. If one is higher, loosen it slightly.
- Stretch and re-check. Press down in the center again and play the drum for a few minutes. New heads stretch, so re-tune after.
What Else Does a Drum Key Tighten?
The key isn't only for tension rods. Some drum hardware uses a similar square drive, so the key earns its spot in your stick bag for more than tuning. What it fits depends on the brand and model, so test it on your own gear before relying on it.
- Bass drum pedals: Many pedals use square-head screws for the clamp, the beater shaft, and the spring tension adjustment.
- Hi-hat clutch and pedal: The clutch locking screw and the pedal's tension screw often take a drum key.
- Tom mounts and stand clamps: Some tom arms, memory locks, and boom arm clamps use square nuts that a key fits.
- Bass drum claw hooks: The hoop claws on a kick are tightened with the key, just like regular rods.
A loose pedal clamp or wobbling tom arm costs you more consistency than a slightly detuned head, so I check hardware with the key before every rehearsal.
Keeping a Hard-Hitting Kit in Tune
Rock and metal drummers hit harder and play longer, faster sets than most, and that changes how you use a key. The goal is not just getting in tune, but staying there.
Re-check Before Every Session
Heavy hitting, heat from stage lights, and humidity swings all shift tension. A quick tap-test of each lug with the key in hand takes two minutes and prevents mid-song detuning.
Tighter, Controlled Toms and Kick
Fast double bass and blast beat patterns need clear, tight attack. A slightly higher-tuned kick batter head with a well-seated bearing edge gives the beater a firm rebound, which helps speed. If you're working on that technique, see our double bass drum pedal guide, since pedal setup also uses your key.
Carry a Spare Key
Keys vanish. Keep at least two: one on your throne bag or stick bag, and one in your cymbal case. Stage drummers who have broken a head mid-set know why.
Common Drum Key Mistakes
Most tuning problems come from technique, not gear. These are the mistakes I see most often, and each one is easy to fix once you know what to look for.
Mistake 1: Tightening Lugs in a Circle
Why it's wrong: Going around in order pulls the hoop unevenly, causing wrinkles, uneven tension, and a pitch that changes depending on where you hit.
How to fix it: Always use the star pattern, and make small equal turns at each lug.
Mistake 2: Cranking a Rod Too Far at Once
Why it's wrong: A big turn on one rod unbalances the head and can warp the hoop or crush the head's collar over time.
How to fix it: Use quarter turns, and check the pitch as you go. Smaller, more frequent adjustments beat one big fix.
Mistake 3: Using a Drill With No Control
Why it's wrong: A drill spins too fast to feel resistance. You can strip the thread on the rod or lug, or snap a rod in cheap hardware.
How to fix it: Use a drill only to loosen rods and finger-seat the head. Always finish tuning by hand.
Mistake 4: Forgetting the Resonant Head
Why it's wrong: The bottom head shapes sustain and tone. Ignoring it leaves a drum sounding boxy or ringing in strange ways.
How to fix it: Tune both heads. Many drummers start with the resonant head slightly higher or about equal to the batter, then adjust by ear.
Mistake 5: Stripping Rods by Using the Wrong Tool
Why it's wrong: A worn or ill-fitting key rounds off the square head of the rod, and eventually it won't grip.
How to fix it: Replace worn keys, make sure the socket is fully seated, and keep a bit of lubricant on the rod threads.
Beginner Tips
These are habits I actually use, not theory. They make tuning faster and keep your hardware in good shape.
- Keep your threads lubricated. A small dab of drum lug lubricant or light grease on the tension rod threads makes turning smoother and prevents seizing.
- Mute while you tap. Press a finger in the center of the head when testing lugs so you hear the lug pitch, not the whole head.
- Mark your lugs. A small piece of tape or marker dot on lug number one keeps your star pattern consistent.
- Re-tune after seating. New heads stretch, so check tension again after your first rehearsal.
- Write down settings you like. A note of turns from finger-tight is a handy reference when you re-head.
- Start simple. Get the snare and kick right first, then tune toms around them.
Conclusion
The drum key does one job, but it touches everything about your sound. Use quarter turns, work in a star pattern, finish by hand, and check your kit before every session. Pick up a speed key for head changes, keep a spare in your bag, and a loud, fast kit will stay tight from soundcheck to the last note.
FAQ
Do all drum keys fit all drums?
A standard drum key fits the tension rods on most modern drums, so one key usually covers a whole kit. Some vintage drums use smaller rod heads that a standard key is too big for, so check that the socket seats snugly before you turn anything.
Can I use a regular wrench or pliers instead?
You can in an emergency, but you risk rounding off the rod head. A proper drum key is cheap and made for the job.
Which way do I turn a drum key to tighten?
Clockwise, looking down at the rod, tightens the head. Counterclockwise loosens it.
Do I need a drum tuner as well as a key?
No. A good ear and a standard key are enough to start. Tuners and torque keys help with consistency but are optional.
How often should I use my drum key?
Check tuning before each practice or gig, especially if you play hard. Do a full tune when you change heads or when the sound changes noticeably.
Can I use a power drill with a drum key?
Yes, with a speed key made for drills, and only for loosening rods or rough seating. Always finish by hand so you can feel the tension.