To mic a drum set, you need at minimum two overhead microphones placed above the kit to capture the full picture, plus a kick drum mic inside the bass drum — that three-mic setup gives you a usable, balanced drum sound right away. As you add more microphones (snare, hi-hat, individual toms), you gain more control over each element in the mix.
That's the starting point. But knowing where to place each mic, what types of microphones actually work on drums, and how to avoid the most common mistakes (phase issues, poor placement, muffled kick sounds) is what separates a drum recording that sounds professional from one that sounds like it was captured in a bathroom with a voice recorder. This guide covers all of it.
We'll walk through what mics you need and why, the step-by-step placement for each drum and cymbal, the classic overhead techniques (including the Glyn Johns method), the most common miking mistakes and how to fix them, and the essential gear needed to get your signal into a computer. Whether you're recording in a home studio or preparing for your first studio session, by the end you'll understand how to mic a kit for a solid, professional-sounding result.
When you’re done reading, you will be familiar with:
- Why Mic Placement Matters
- What You'll Need
- Microphone Types for Drums
- Miking the Kick Drum
- Miking the Snare
- Overhead Microphones
- Miking the Toms
- Miking the Hi-Hat
- Classic Miking Techniques
- Common Miking Mistakes
- Beginner Tips for Recording Drums
- Final Thoughts
- FAQ

Why Mic Placement Matters
A microphone doesn't just pick up the drum closest to it — it picks up everything in the room. Where you place each mic determines what it hears most clearly, what bleeds into it from other parts of the kit, and how the final mix comes together. Move a snare mic two inches in the wrong direction and you lose attack; leave your overheads too far apart and the stereo image falls apart. Get phase relationships wrong between multiple mics and elements of the kit cancel each other out, producing a thin, hollow sound no amount of EQ will fix.
Good mic placement gives your recording engineer (or you, if you're mixing yourself) clean, separated signals with minimal problems to solve. Bad placement creates problems that are very difficult to fix after the fact. Learning proper placement is the single biggest skill you can develop for drum recording — more valuable than buying expensive microphones.
What You'll Need
Before placing a single mic, you need the right gear chain from microphone to recording device. Here's what the basic setup requires:
- Microphones. For a minimal kit, two overhead condensers and one kick drum dynamic mic. For a full close-mic setup: kick mic, snare mic (dynamic), overhead pair (condensers), and optionally tom mics and a hi-hat condenser.
- Mic stands and boom arms. Overhead mics need tall stands with boom arms that can reach over the kit. Kick drum mics need a short stand or clip to position inside the bass drum. Snare and tom mics typically use rim-clamp clip-on mounts.
- An audio interface. This converts the mic signal to digital so your computer can record it. For two mics you need at least a 2-channel interface (Focusrite Scarlett 2i2 is the standard beginner choice). For a full kit with 6–8 mics, you need an 8-channel interface or a combination of interface and preamp expander.
- XLR cables. One per microphone. Standard balanced XLR cables in 15–20 foot lengths are typically enough to reach from mic stands to the interface at the edge of the room.
- A recording computer and DAW. Logic Pro, GarageBand, Reaper, Pro Tools, or any other DAW capable of recording multiple tracks simultaneously. Most DAWs come with a free version or trial.
- Headphones or monitors. To listen back and check levels before committing a take.
Microphone Types for Drums
Two types of microphones handle the majority of drum recording work, and understanding why each is used where it is will help you make smart decisions about your setup.
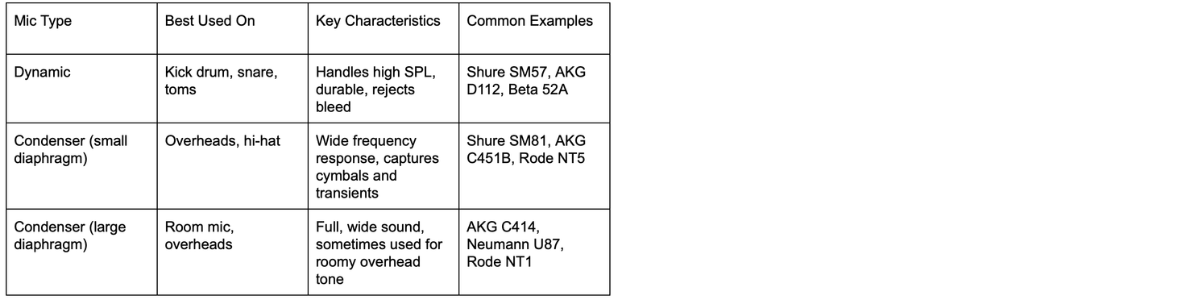
Dynamic Microphones
Dynamic mics are robust, handle high sound pressure levels without distorting, and reject a lot of the bleed from nearby instruments. This makes them ideal for kick drums, snare drums, and toms — all of which are hit hard and produce high SPL at close range. The Shure SM57 is the industry-standard snare and tom mic used on virtually every professional recording you've ever heard. The AKG D112, Shure Beta 52A, and Sennheiser e602 are the standard choices for kick drum. Dynamics don't require phantom power and are generally more durable than condensers.
Condenser Microphones
Condensers are more sensitive across a wider frequency range and capture transients (the sharp attack of a cymbal or hi-hat) with more detail than dynamics. This makes them the standard choice for overhead mics, which need to capture the full sonic picture of the kit including the shimmer and spread of the cymbals. They require phantom power (48V) from your audio interface, and they're more fragile than dynamics — you don't want to accidentally knock an overhead condenser into a crash cymbal while the drummer is setting up. The Shure SM81, AKG C451B, and Rode NT5 are well-regarded overhead choices across different price points.
Miking the Kick Drum
The kick drum mic is one of the most important sounds in a drum recording — it drives the low end of the entire track. Getting it right makes a huge difference to how the mix feels.
Most kick drum recording starts with a port hole (a small circular hole cut in the front head) or with the front head removed entirely. This lets you place the mic inside the shell, closer to the batter head, which gives you more attack and less room sound.
Basic Placement
Position the mic inside the bass drum, pointed toward the beater impact area on the batter head. A mic placed closer to the beater (within 2–4 inches) will pick up more click and attack — useful for rock and metal where you want to hear every note of a fast double bass pattern. Pulling the mic back toward the center of the shell (6–10 inches from the batter head) gives you more low-end thump and less click — good for hip-hop, R&B, and recorded sounds where the kick needs to feel powerful rather than precise.
Angling the mic slightly off-axis (tilted away from the direct beater hit rather than pointing straight at it) can reduce harsh high frequencies and give a more rounded sound without losing the fundamental punch.
If There's No Port Hole
If the front head is intact (no port hole), place the mic just outside the front head, pointed at it, roughly in the center of the head. This approach captures more resonance and sustain but less attack. It works well for jazz and softer styles, less so for rock where you need a defined click on each hit.
Miking the Snare
The snare is the most EQ'd and processed drum in any mix, and good placement gives you a better starting point before you touch a knob.
Basic Placement
The standard position for a snare mic is on the top (batter) side, using a rim-clamp mount or a small stand. Point the capsule toward the center of the batter head from an angle of roughly 45–60 degrees from horizontal. Place the mic 1–3 inches above the rim, capsule aimed at the impact zone — roughly where the drummer actually strikes the drum.
Getting the mic too close to the drummer's stick path is the most common snare mic mistake. The mic needs to be out of stick range while still capturing the drum's sound. If the drummer hits the mic on a cross-stick or a wide stroke, that's a sign to reposition.
Bottom Snare Mic
Recording both the top and bottom heads of the snare gives you the ability to blend the crack from the batter head with the snare wire buzz from the resonant head. A second mic (another SM57 or a condenser) pointed up at the bottom head from below, about 1–2 inches from the head, captures the wire sound. When using two snare mics, you must flip the phase (polarity) on the bottom mic in your DAW — the two heads move in opposite directions, so without phase flipping, they cancel each other out and produce a thin, hollow result.
Overhead Microphones
The overhead pair is the backbone of a drum recording. Even in a fully close-miked setup, the overheads capture the glue that holds the kit together — the stereo width, cymbal shimmer, and overall kit perspective that makes the recording sound like a real instrument rather than a collection of isolated hits.
ORTF Overhead Placement
The most widely used overhead configuration for beginners and professionals alike is the ORTF (Office de Radiodiffusion-Télévision Française) stereo technique. Position two cardioid condensers with their capsules approximately 17cm (about 7 inches) apart, angled outward at 110 degrees from each other, at a height of roughly 3–5 feet above the snare drum. The pair should be positioned so the center between them sits above the snare drum — not over the ride cymbal, not over the kick drum, but over the center of the kit.
This placement gives you a natural stereo image and good cymbal capture. The further up you raise the mics, the more room you hear and the less close kit detail you get. Starting at about 3–4 feet above the snare is a safe baseline to work from.
Spaced Pair (A/B) Placement
An alternative to ORTF is the simple spaced pair: two condensers positioned parallel, roughly 3–4 feet above the kit, spread apart so one is roughly above the hi-hats and one is roughly above the ride. This gives a wide, spacious stereo image — good for jazz and room-heavy recordings. The downside is that the wider spacing increases the chance of phase issues with close mics.
Whichever technique you use, checking the phase relationship between your overheads and close mics (especially the snare and kick) in your DAW should be one of your first steps after setting up. If the snare sounds hollow or the kick loses low end, phase is the likely culprit.
Miking the Toms
Toms are usually miked individually with small dynamic mics or clip-on condensers mounted to the rim. The technique is similar to snare miking: angle the capsule toward the center of the batter head from about 45 degrees above the rim, 1–3 inches from the head surface.
The primary challenge with tom mics is bleed — when the drummer is playing the snare or hi-hats, the tom mics will pick up some of that sound too. Positioning the tom mics closer to the heads and using gate plugins on the tom tracks in your DAW (which close the channel when the drum isn't being hit) keeps bleed under control.
For a two-rack-tom, one-floor-tom setup, you'll need three mics. Common choices include the Sennheiser e604 (clip-on) or Shure SM57 on short stands. For most beginner and home studio recordings, well-placed overheads capture enough of the tom sound that you can get by without individual tom mics — adding them is an enhancement, not a requirement.
Miking the Hi-Hat
The hi-hat is the most optional close mic in a standard setup — your overhead mics will capture it well as part of the full kit picture. When you do mic the hi-hat separately (for more definition in a pop or R&B recording where the hi-hat pattern is prominent), use a small diaphragm condenser positioned 4–6 inches above the top cymbal, angled slightly off-axis to reduce the harsh "chick" of the closed hat and pick up more of the natural shimmer.
Point the capsule down toward the edge of the hi-hat rather than straight down at the center — this position captures the tonal character of the cymbal more naturally and avoids the excessive air-movement noise (the "whoosh" from the cymbals opening and closing) that a center-aimed placement picks up.
Classic Miking Techniques
Two overhead approaches have become standards in the recording world and are worth knowing by name, because you'll encounter them in tutorials and session notes.
Glyn Johns Technique
The Glyn Johns method uses just three or four mics to capture a full, natural kit sound — it was used on classic Led Zeppelin, Who, and Rolling Stones recordings, among others. Two mics are used as the stereo pair: one overhead positioned above the drummer's right shoulder (over the ride cymbal, roughly 3 feet above the snare), and one positioned directly to the right of the floor tom, roughly the same distance from the snare as the first mic. A third mic goes on the kick drum. Optionally, a fourth goes on the snare. The result is a wide, natural stereo image with a slightly jazz-influenced perspective that suits rock and live-sounding recordings very well. Our detailed guide to the Glyn Johns technique walks through the exact mic placements with diagrams.
Recorderman Technique
The Recorderman technique is similar to Glyn Johns but positions both condensers the same distance from two reference points: the beater impact point on the kick drum and the snare. One mic goes directly over the snare (pointing straight down), and one goes over the drummer's right shoulder, at a height calculated to be equidistant from both the kick and snare. This equal-distance approach naturally phase-aligns the two overheads with the kick and snare, reducing phase problems without needing to manually check and adjust.

Common Miking Mistakes
These are the mistakes that show up most often when drummers start recording themselves — and the fixes that actually work.
Not Checking Phase Between Mics
Why it's wrong: When two mics pick up the same sound source at slightly different distances, they receive the signal at slightly different times. This time difference creates phase cancellation — frequency content that sounds full in isolation disappears or weakens when the mics are combined. The result is a thin, hollow sound that no EQ can fully fix.
How to fix it: In your DAW, use the phase (polarity) flip button on each close mic while listening to the full kit mix. If the snare or kick sounds bigger when you flip the phase, leave it flipped. Always flip the bottom snare mic phase as a starting point. For overheads, use the "three-to-one rule" as a guide: keep mics at least three times the distance from each other that they are from their respective sources.
Placing the Kick Mic Too Far from the Beater
Why it's wrong: A kick drum mic placed at the port hole but not reaching inside the shell picks up a lot of room ambience and resonance, and not much of the beater attack. The result is a boomy, muddy kick with no definition — it disappears in a dense mix.
How to fix it: Get the mic inside the shell, pointed at the beater impact area. Start with the mic 4–6 inches from the batter head and adjust from there. If you want more click, move closer to the beater. More thump, pull back slightly toward center.
Setting Mic Gain Too Hot
Why it's wrong: Drums produce sudden, loud transients — the initial hit of a snare or crash is often 10–15dB louder than the average signal level. If you set gain by looking at average levels, the peaks will clip your preamp or interface input, causing distortion. Digital clipping sounds bad and can't be fixed in post.
How to fix it: Set your interface input gain while the drummer is playing as hard as they'll play during the actual recording (not a light warm-up). Leave 6dB of headroom above the peaks — if the loudest hits are reaching -6dBFS on the meter, you're in the right zone. For kick and snare mics especially, err on the side of lower gain.
Skipping the Room Preparation
Why it's wrong: Microphones capture the room as well as the drums. A room with hard, parallel walls (bare concrete, tile, or drywall) produces harsh, boxy reflections that color the recording in ways that are very difficult to remove. Overheads are especially sensitive to room sound.
How to fix it: Basic acoustic treatment in the recording space — a few moving blankets hung on stands, rugs on the floor, mattresses against a wall — can significantly improve an untreated room. This doesn't need to be professional acoustic treatment: anything that absorbs reflections rather than bouncing them back helps. If the room sounds bad to your ears when you clap in it, it'll sound bad in your recordings.
Recording Without Listening to Bleed
Why it's wrong: Before recording a full take, many beginners don't check what each mic is actually picking up in isolation. A snare mic placed too low may be picking up more hi-hat than snare. An overhead placed too far toward the ride may leave the hi-hat sounding distant and the left side of the kit unbalanced.
How to fix it: Before tracking, solo each mic in your DAW and listen carefully. The kick mic should sound mostly like a kick drum. The snare mic should sound mostly like a snare. If the snare mic sounds like a room recording of the whole kit, it's too far away. Make placement adjustments before you start recording, not after.
Beginner Tips for Recording Drums
- Tune the kit before any recording session. A badly tuned drum sounds worse through a microphone than it does to the naked ear. Even a basic tune-up — evening out the head tension on each drum — makes a significant difference on tape. Knowing how to tune a snare drum is particularly important since the snare is the most exposed element in a recording.
- Start with fewer mics. A kick and two overheads is a legitimate professional recording setup. Don't feel like you need eight mics before you can get a good sound. The Glyn Johns and Recorderman techniques are used by professional engineers precisely because they produce excellent results with minimal mic counts.
- Record a reference take first. Before tweaking placement, record one pass of the kit as-is. Listen back critically in headphones. This tells you what problems actually exist rather than problems you imagine might exist. Fix what you can hear, not what you think might be wrong.
- Keep a notebook of what worked. Once you find a placement that sounds good in a specific room, write it down: mic model, height, angle, distance from the drum. Recreating a good setup later is much faster than figuring it out from scratch.
- Replace drum heads before important recordings. Old, dented batter heads sound dull through microphones. Fresh heads — even basic ones — give recordings a clarity and resonance that's very hard to add artificially in post. Our guide to replacing drum heads covers the full process if you've never done it.
- Don't let the drummer rush to fix mistakes. Recording drums requires everyone to be patient. The most common problem in a home drum recording session is rushing placement and gain staging to "just start playing." Take 30 extra minutes to check mics, listen back, and fix problems before you start. You'll save hours of frustration later.
- I usually check kick and snare phase last, just before the first real take. It's easy to bump a mic or shift something slightly between your test pass and the tracking session. One quick phase check when everything is in final position catches problems before they end up recorded.
Final Thoughts
Recording drums well is a skill that takes time to develop, but the fundamentals aren't complicated: good placement, phase-coherent mics, proper gain staging, and a room that doesn't fight you. Start with the minimum viable setup — kick plus overheads — and build from there once you understand what each mic is contributing.
The most important shift in mindset is treating mic placement as the creative decision it actually is, not just a technical setup step. Where you position a mic relative to the drum defines the character of the sound you'll be working with for the entire mix. Getting that right before you hit record makes everything downstream easier — for you, and for whoever's mixing the session.
Tune the kit, check phase, leave headroom, and take the time to listen back before you start recording. Those four habits alone will put your drum recordings ahead of most of what comes out of home studios.
FAQ
How many mics do I need to record a drum set?
You can get a usable, professional-sounding drum recording with as few as two mics (a stereo overhead pair) or three (overheads plus kick). A full close-mic setup uses 6–10 mics. For beginners, start with the minimal approach — two overheads and a kick — and add mics as your experience and budget grow.
What is the best microphone for a kick drum?
The AKG D112 and Shure Beta 52A are the standard professional choices. The Audix D6 is another favorite. All are large-diaphragm dynamics specifically designed for the extended low-frequency response and high SPL handling that kick drum recording requires. The Shure SM57 can work in a pinch but lacks the deep low-end extension of a dedicated kick mic.
Can I record drums with just one microphone?
Yes, and it can sound great in the right room. A single large-diaphragm condenser positioned above the kit — roughly 3–4 feet over the snare — captures a natural mono image of the full kit. It works particularly well for jazz and acoustic recordings where a natural, un-processed sound is the goal. The Glyn Johns technique effectively extends this to 3–4 mics without losing that natural quality.
Do I need acoustic treatment to record drums?
You don't need professional acoustic panels, but you do need to address obvious reflection problems. A bare concrete or tile room will sound harsh and boxy in drum recordings. Moving blankets, heavy rugs, bookshelves full of books, and foam panels all help. The goal is reducing harsh parallel reflections, not creating an anechoic environment.
What audio interface do I need for recording drums?
For two mics: a 2-channel interface (Focusrite Scarlett 2i2, PreSonus AudioBox USB). For a full close-mic setup with 6–8 mics: an 8-channel interface like the Focusrite Scarlett 18i8 or a combination of interface with preamp expander. Make sure the interface has enough microphone preamp inputs with phantom power for your condenser mics.
What does phase cancellation sound like on drums?
Phase cancellation on drums typically sounds like a thin, hollow snare drum, a kick that loses its low end, or an overall "scooped" sound where frequencies in the 200–500Hz range seem to disappear. If the kit sounds noticeably better with some tracks muted, phase between those mics is the first thing to check.


