To set up your drum cymbals correctly, place each one within an easy, relaxed stick reach just above your drums, tilt it slightly toward you so the stick strikes the bow and edge at a glancing angle, and tighten the wing nut only enough to hold the cymbal in place while still letting it move freely.
That's the core of it, but cymbal placement is where most beginners and plenty of experienced players quietly lose speed, comfort, and cymbals. A crash set too high drags your shoulder up every time you hit it. A ride at the wrong angle forces your wrist to twist. Wing nuts cranked down tight turn a $300 crash into a cracked one in a few months.
In this guide we'll cover how a cymbal stand actually works, how to position the hi-hat, crashes, ride, and china, a quick reference table for height and angle, the mistakes that crack cymbals and strain hands, and a few adjustments rock and metal drummers make for loud, fast playing. By the end you'll be able to build a cymbal setup that feels natural, sounds open, and survives hard hitting.
When you’re done reading, you will be familiar with:
- Why does cymbal setup matter?
- What are the parts of a cymbal stand?
- How do I set up each cymbal, step by step?
- What heights and angles should I start with?
- How should rock and metal drummers adjust?
- What cymbal setup mistakes should I avoid?
- Beginner tips for a better cymbal setup
- Conclusion
- FAQ

Why Does Cymbal Setup Matter?
Your cymbals are the loudest, most exposed part of the kit, and they are also the part you reach for most. Where they sit decides how much your arms move, how much your shoulders tense up, and how long your cymbals last.
It Protects Your Body
Every unnecessary lift or stretch gets repeated thousands of times in a set. Cymbals mounted too high keep your shoulders raised, and cymbals mounted too far away make you lean off the throne. Both lead to fatigue and, over time, sore shoulders, wrists, and lower back.
It Protects Your Cymbals
A cymbal is thin, hammered bronze that has to flex to make sound. Hit it flat from above with a tight wing nut and a metal stand beneath it and the edge has nowhere to go. That's how keyholes (cracks that start at the mounting hole) and edge cracks happen.
It Shapes Your Sound
A cymbal that can swing and vibrate freely rings, washes, and decays the way it was designed to. A choked, over-tightened one sounds dull and clanky. Set up well, even a budget cymbal sounds better than a pricey one fighting its own stand.
What Are the Parts of a Cymbal Stand?
Before you start positioning anything, it helps to know what each piece of hardware does. If you're still learning your way around the kit, our overview of the parts of a drum set covers the rest of the hardware.
- Tripod base: The three legs that keep the stand stable. Leave them spread wide and point one leg toward the front of the stand's reach so it doesn't tangle with your bass drum pedals.
- Tilter: The gear or ratchet at the top that sets the cymbal angle. Most modern stands use a geared tilter that locks firmly in place.
- Boom arm: The angled extension that lets you reach a cymbal over the toms. Many have a counterweight on the back to balance the cymbal.
- Cymbal felt: The felt washers that sit above and below the cymbal. They stop metal from touching metal.
- Nylon sleeve: The plastic tube around the threaded post that protects the cymbal's center hole from the threads.
- Wing nut: The top nut that holds the cymbal on. This is the most commonly misused piece on the whole stand.
- Cymbal washer: A metal or plastic washer between the felt and the wing nut.
How Do I Set Up Each Cymbal, Step by Step?
Start by sitting at the kit on your throne at your normal playing height. Cymbal setup is a seated job: everything is measured from where your hands actually fall, not from how the kit looks when you're standing. Set your throne and drums first, then add cymbals around them.
1. Assemble the Cymbal Mount Correctly
Build from the bottom up on the threaded post: stand, bottom felt, cymbal, top felt, washer, then wing nut. Make sure the nylon sleeve covers the threads where the cymbal sits. If your stand has no sleeve, add one or at least keep the threads away from the cymbal hole.
Tighten the wing nut only until it stops the cymbal from sliding off, then back it off a little. The cymbal should be able to wobble and sway when you hit it. If it can't move, the nut is too tight.
2. Position the Hi-Hat
The hi-hat is the cymbal your left hand (or right, if you play left-handed) will visit most, and it sits to the left of the snare. Set the top cymbal height so that when your stick is on the closed hi-hat, your forearm is roughly level with the snare, not climbing uphill.
A good starting point is about an inch or two of clearance between the snare rim and the bottom hi-hat cymbal. Tilt the hi-hat very slightly toward you. Too much tilt stops the cymbals from sealing properly when closed, and too little can make the stick bounce awkwardly.
Adjust the clutch so there is only a thin gap, about a finger's width or less, between the top and bottom cymbals when the pedal is up. A huge gap makes crisp closed notes harder, and a tiny gap chokes open playing. If you want to build more control here, our guide on how to play hi-hat goes deeper on technique.
3. Place the Ride Cymbal
Most drummers put the ride on the right, above or just beyond the floor tom or high tom. You want to be able to play the bow (the main flat area) with your stick naturally falling from your wrist, not reaching up or out.
Tilt the ride so the front edge is slightly lower than the back, at roughly a 10 to 20 degree angle toward you. That lets the stick strike the bow at a gentle angle and bounce back easily. A ride tilted too steeply will feel like hitting a wall at the bell and edge.
Set the height so that your stick hits the bow with your forearm roughly parallel to the floor or sloping very slightly downward. If your elbow has to rise above shoulder level to play it, lower it.
4. Add the Crash Cymbals
Crash cymbals are hit with a sweeping motion across the edge, not a flat chop. Put the primary crash on the left or right of the kit so you can reach it with a natural arc. Your stick should meet the edge and shoulder at an angle, with the cymbal tilted toward you at about 15 to 30 degrees.
Mount crashes a bit higher than your ride and toms, but still within a relaxed reach. A solid rule: if you can't hit the cymbal without lifting your shoulder, it's too high. Cymbals slightly above the drums are easiest on your body, and our post on types of cymbals explains which models suit different positions in the kit.
5. Mount the China or Effects Cymbal
China and splash cymbals are usually the outermost, highest-reach cymbals. Place them where you can reach them quickly but not by accident. A china is often mounted upside down or tilted up so the stick hits the lip with a glancing blow, and many players keep the angle flatter and tighter than a crash.
Keep them at a height that doesn't tempt you to swing wildly. Effects cymbals are accents, not your main voice, so you want them close enough to hit cleanly but not so close that they interfere with the hi-hat or other cymbals.
6. Check Clearances and Reach
Once all cymbals are placed, play through your most common patterns slowly. Look for places where your stick clips a cymbal stand, where cymbals touch each other when you hit them, or where your hand collides with a tom. Every cymbal should be able to swing freely without hitting another one or a tom.
What Heights and Angles Should I Start With?
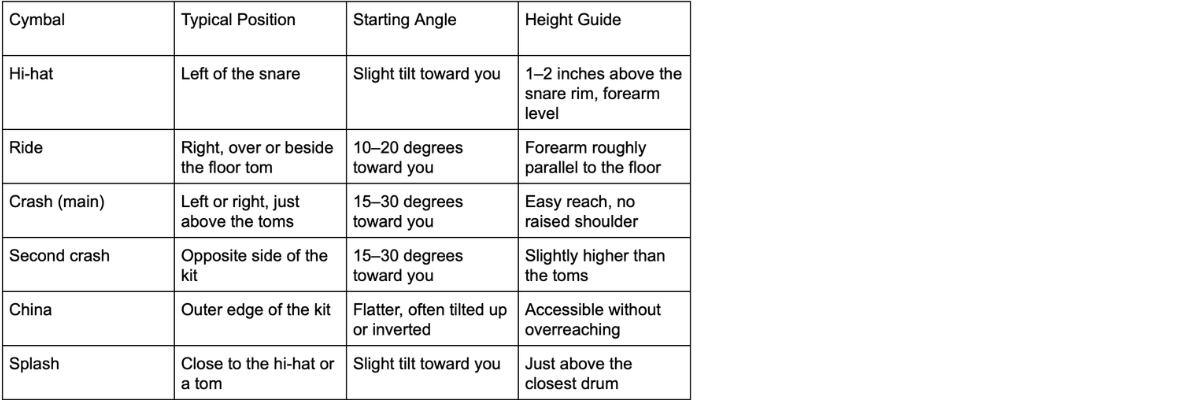
The table below gives starting points. Every drummer's body and kit are different, so treat these as a baseline, then adjust to feel comfortable.
How Should Rock and Metal Drummers Adjust?
Loud, fast, aggressive playing puts more stress on cymbals and demands tighter placement. A few adjustments come up often in rock and metal setups.
Keep Everything Closer
When you're playing fast double bass, blast beats, or rapid fills, wasted movement costs you speed. Many metal drummers mount cymbals tighter and lower than the picture-perfect textbook setup so every hit needs less travel. If you play double bass, give your feet room first, since a double bass drum pedal setup often limits where stands can go.
Use a Little More Tilt for Hard Hitting
Heavy hitters usually angle crashes a bit more toward themselves so the stick glances off the edge rather than slamming into it flat. That reduces the shock on the cymbal and gives a bigger, cleaner crash sound.
Use Boom Stands and Counterweights
Booms let you place cymbals over the kit without stand legs crowding your hardware. A counterweight keeps heavier cymbals from drooping, which matters when you're pounding thick crashes and chinas night after night.
Stack Effects Smartly
Splash or china stacks are popular in rock and metal, but they should be mounted on a sturdy stand that doesn't wobble. Fewer, better-placed cymbals will always beat a crowded kit that hurts your reach.
What Cymbal Setup Mistakes Should I Avoid?
Mistake 1: Over-Tightening the Wing Nut
Why it's wrong: A cymbal clamped tight can't flex or swing, so energy goes into the metal instead of out as sound. That leads to a choked tone, wear around the hole, and eventual cracks.
How to fix it: Tighten the wing nut only until the cymbal is held, then loosen it slightly. The cymbal should wobble a little when struck.
Mistake 2: Mounting Cymbals Too High
Why it's wrong: Raised shoulders and lifted elbows tire you out and make fast patterns harder to control. It also tempts you to swing from the shoulder instead of the wrist.
How to fix it: Lower each cymbal until you can hit it with a relaxed arm. Sit at the kit and let your forearm hang naturally to find the right height.
Mistake 3: Mounting Cymbals Too Flat
Why it's wrong: Flat cymbals force you to hit straight down on the edge, which is the most common cause of cracks and the harshest sound a cymbal can make.
How to fix it: Tilt each cymbal toward you so your stick strikes at a glancing angle. Use the tilter to adjust in small steps.
Mistake 4: Skipping the Felts and Sleeves
Why it's wrong: Without felts and a sleeve, metal grinds against metal. The cymbal hole wears and cracks, and the cymbal sounds harsh and rattly.
How to fix it: Use felts above and below every cymbal and replace them when they get flat or torn. Keep a plastic sleeve over the threads.
Mistake 5: Cymbals Touching Each Other
Why it's wrong: Overlapping cymbals clang into each other and change their sound. Contact also wears edges and can cause cracks.
How to fix it: Adjust heights and angles so each cymbal has a few inches of clearance. Stack cymbals only when you plan to.
Beginner Tips for a Better Cymbal Setup
- Set your throne first. Everything on the kit depends on your seat height. Our guide on how to choose a drum throne will help if yours is uncomfortable.
- Start with fewer cymbals. A hi-hat, one crash, and a ride is plenty. Add a second crash or china once those feel automatic.
- Mark your stands. A bit of tape or a marker on each stand lets you rebuild your setup exactly after gigs or practice.
- Take photos. A quick picture from the throne saves you guessing next time.
- Adjust in small steps. Move height or tilt a little, play for a few minutes, then adjust again.
- Replace worn felts and sleeves. They are cheap and protect cymbals that cost far more.
- Check your stands regularly. A stand that slowly slips during a song ruins your angle and your focus.
- Use the right sticks. Heavier sticks and cymbals are harder on setups, so match them sensibly. See our guide to types of drumsticks for options.
Conclusion
A good cymbal setup is simple: seat yourself first, keep every cymbal within a relaxed reach, tilt each toward you, and leave the wing nuts loose enough for the metal to move. Build your setup one cymbal at a time, play real grooves to test it, and keep adjusting in small steps until nothing makes you stretch or tense up. Your cymbals will sound better, last longer, and your playing will feel easier.
FAQ
How high should cymbals be on a drum set?
High enough to clear your drums and low enough that you can hit them with a relaxed arm and no raised shoulder. For most drummers that means just above the toms, but your body size and playing style decide the exact height.
What angle should a crash cymbal be at?
Tilt it toward you about 15 to 30 degrees so the stick glances across the edge. Flatter than that risks cracks, and steeper makes the cymbal feel awkward to reach.
How tight should the wing nut be on a cymbal?
Tight enough to stop the cymbal from falling off, and loose enough that the cymbal can wobble when you strike it. If it can't move, it's too tight.
Should the hi-hat be level or tilted?
A very slight tilt toward you is common and comfortable. Large tilts stop the cymbals from closing evenly, so keep it subtle.
Where should the ride cymbal go?
Usually on the right over or beside the floor tom or high tom, at a height where your forearm is roughly parallel to the floor. Left-handed players often mirror this.
Why do my cymbals keep cracking?
The usual causes are hitting them flat from above, over-tightened wing nuts, missing felts or sleeves, and cymbals that touch each other. Fix the setup first and keep your technique glancing rather than chopping.